The 3 exercises in this article are great for building strength and for preventing knee pain if you’re getting back into volleyball after a longer break. Let’s start with one I used to hate.
Video Transcript:
Exercise 1: Stronger Knees
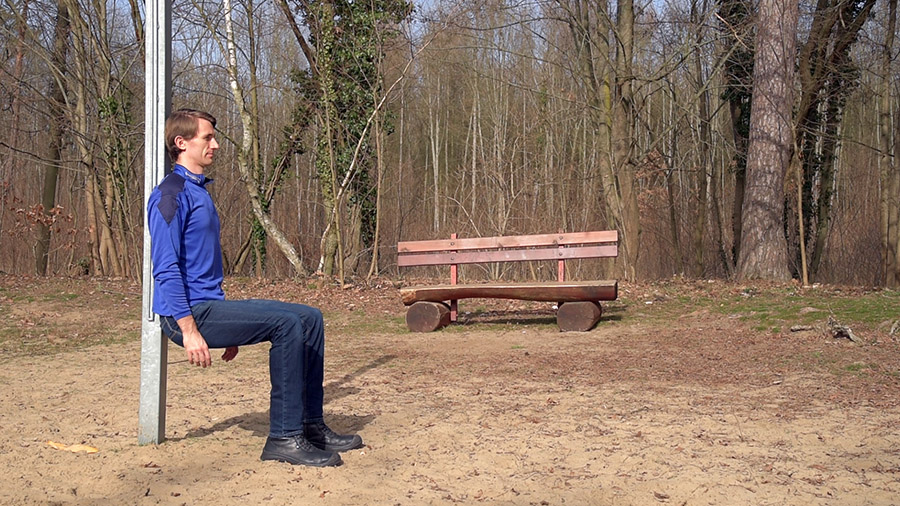
Okay so you may be thinking “wall sits? That’s way too easy!” and sure, if you’ve kept up your strength training and did at least one leg day per week over the last couple of months, you can skip this one.
Everyone else is better off doing wall sits for two or three weeks before moving on to exercise 2. Remember we’re doing this to get the tendons ready for explosive movements and the best method to achieve positive tendon adaption is through progressive loading with slow strengthening exercises, like the wall sit.
To do a wall sit you keep your feet parallel and far enough away from the wall so that your shins are vertical. You can make the exercise harder by sliding the hip down to parallel or easier by not going as low.
Build up your endurance in the wall sits until you can do 3 minutes with your thighs about parallel to the ground and then move on to exercise number two.
Exercise 2: Better Force Absorption
With this exercise we’re doing three things:
- Building stronger legs
- Further strengthening the patellar tendons
- Practicing eccentric movement control
That’s when a muscle lengthens under load, so for the quads this happens when you’re landing from a jump. You can have strong legs and a fantastic vertical leap, but if your quads can’t absorb enough of the impact energy from landing you’re at higher risk of developing patellar tendonitis because more energy will be absorbed by the tendon instead.
A simple exercise to practice this at home is the slow squat. You stand in front of chair with your feet hip-width apart and pointed forward. Then you sit back until your hip gently touches the chair. Then you push up again.

The first couple of weeks you’ll do the two-legged version. You can use weights to load the exercise if you want.
The goal is to eventually transition to single-leg squats to parallel. One way to do that is by just placing more and more weight on one side as you do the squat.
For example you could do 8 squats with about 70% of your weight on the left leg and then do another 8 squats with 70% of your weight on the right leg. After a few weeks you’ll be able to do 90% on one leg and then it won’t be long until you can do single-leg squats to parallel.
The key technique points here are to keep your knee aligned over your toes and to keep your hips parallel to the ground. You don’t want your knee to collapse toward the midline of the body. The pressure on the sole of your foot should be under the balls of your feet, your big toe, the outer side of the foot, and the heel. You don’t want this pressure to move towards the arch of the foot.
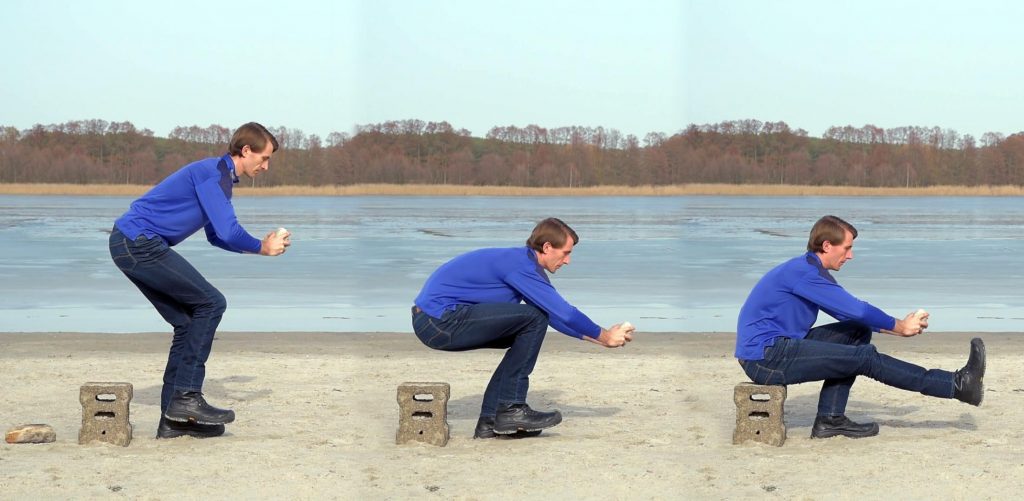
Only do this if you’re strong enough to do it with good technique.
My advice is to build up to being able to do 3 sets of 15 reps before getting back into sports. Since we’re not doing this for rehab purposes we can do the exercise with a regular tempo of taking about 2 seconds for the eccentric part and 1 second for the concentric part.
So now that we had some fun, what say you we try another non-fun exercise?
Exercise 3: For Relaxed Legs
What happens if you sit most of the day, but train your legs regularly and then do a lot of jumping?
That’s right: muscle tightness.
If you want to prevent knee pain, especially patellar tendonitis, you have to counter this tightness by doing regular self-massage and stretching, so let me show you an effective stretches you can use for that. If you want to do more than that I’ll give you two other great recommendations in a moment.
The Wall Quad Stretch
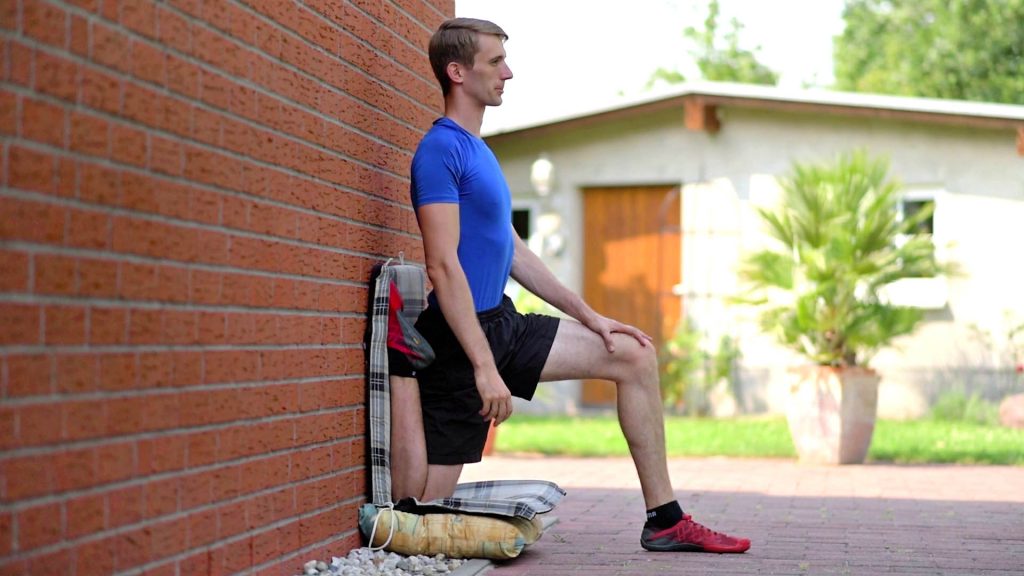
The wall quad stretch is the big brother of the couch stretch: more intense, more effective, but also a bit more difficult to get into.
Set up in front of the wall and have a thick pillow or folded blanket ready as a cushion. Now kneel down and place the rear leg all the way up to the wall, with your shin touching the wall. Next you push up, keeping your glutes and core braced to maintain a neutral spine.
You don’t want to go into lumbar hyperextension, because that takes makes the stretch a lot less effective and also places your back at risk.
If you’re unsure about the correct alignment you can do the exercise with a stick behind your back. Keep the stick in contact with your tailbone, your upper back, and your head. There should just be enough space in the lower back region so that you can slide a couple of fingers through, but not more.
Now you can experiment with how you need to work your core muscles to maintain those points of contact and once you’ve figured it out you can sink deeper into the stretch.
And by the way, this lumbar hyperextension is something you’ll see in a lot of hip flexor and quad stretches. Essentially, since the rectus femoris from your quads attaches to the front of the hip and the hip flexors attach to the front of the hip as well as the lumbar spine. So stretches for both of these muscle groups will pull the front of the hip and the lumbar spine forward and down.
So if someone does a hip flexor stretch like this:
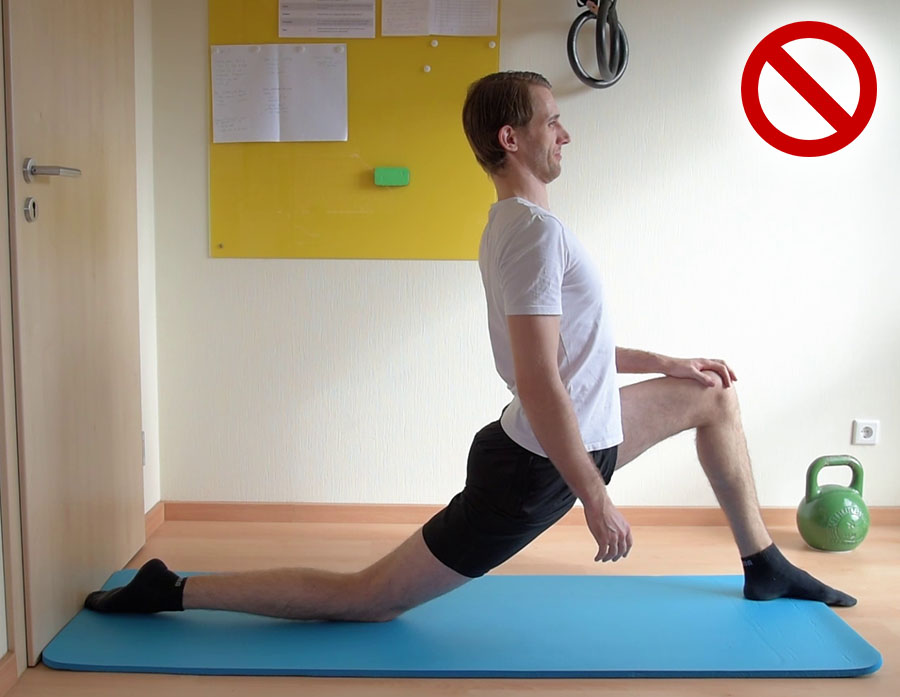
… it may look like they’re super flexible, but in reality that’s because the hip is tilted forward. Here’s the better alignment again for comparison:
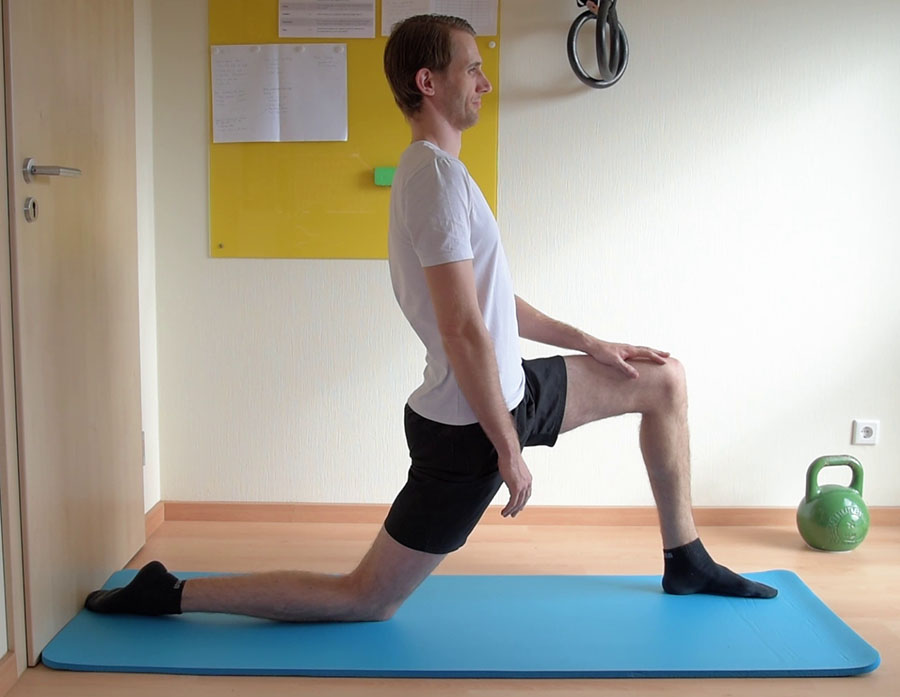
If you’re new to this stretch or haven’t done it in a while it will be tough, but eventually the quads relax and you can sink deeper into stretch. Keep your breathing relaxed and stay in the stretch for at least two minutes. Then do the other side.
The great thing about the couch stretch and the wall quad stretch is that you can do them while watching TV to make the time pass a little more quickly.
I do not recommend doing the wall quad stretch if you’re currently dealing with knee pain. If you do have pain, check out my research summaries about patellar tendonitis and IT-Band Syndrome.
Two questions that remain are how long and how often you should stretch. You want to stretch at least once per day for 2 minutes per side. That’s the bare minimum to make progress.
If you want to do more you can also stretch your calves and your hamstrings, but only if it’s necessary of course. If you want to beef up your prep routine further you could also incorporate strengthening exercises for the calves, hamstrings, and gluteal muscles.
However, the combination of single-leg squats plus a quad stretch will already make your legs feel much stronger and more stable. It may seem difficult at first, but let me assure you that it’s definitely doable and great way to prevent knee pain from volleyball, as the slow movement will strengthen the tendons and the improved stability will protect against acute injuries.
Click here for a PDF summary of the exercises we went through in this article.
