Do you like swimming?
No?
That’s tough luck, because swimming is the go-to cardio recommendation for folks with a knee injury.
And there isn’t much else other than cycling and the elliptical … at least that’s what a quick online search would suggest.
The truth is that you actually have TOO MANY options, as you will see.
Picking Your Favorites
The following list will give you a huge variety of exercises and training ideas you can use to stay in shape with knee pain.
This list is just for your inspiration.
You don’t have to do every exercise.
You don’t even have to read the whole list.
Just pick a couple of exercises that sound cool to you, try them, and add them to your training if you like them.
We’ll also talk about how you can create a short and fun routine further down, in case you’re unsure about that and we’ll go over some specific suggestions for individual knee injuries.
The List
Some of the following suggestions may seem unsuitable for cardio, but with a few simple changes you can turn any strength exercise into a cardio exercise. If you have a knee injury you can use these exercises for cardio, for building muscle, and for staying in shape.
To turn a strength exercise into a cardio drill you reduce the resistance until you can do 15+ repetitions of that drill. This can mean using less weight or using a different variation, like doing push-ups with your hands on a table instead of on the ground, for example.
I’ve also added a risk assessment to each exercise. This will give you a basic idea how risky a certain exercise can be for someone with knee pain. You still want to use your own judgment regarding whether you should do a certain exercise or not.
Let’s get started with the list.
1. Chin-Ups
Risk: Very Low
Chin-ups are a fantastic upper body exercise that will develop your grip strength, arms, and upper back.
Unfortunately they can be punishing for beginners if you’re unfamiliar with the easier variations. Here’s a selection from easiest to hardest.
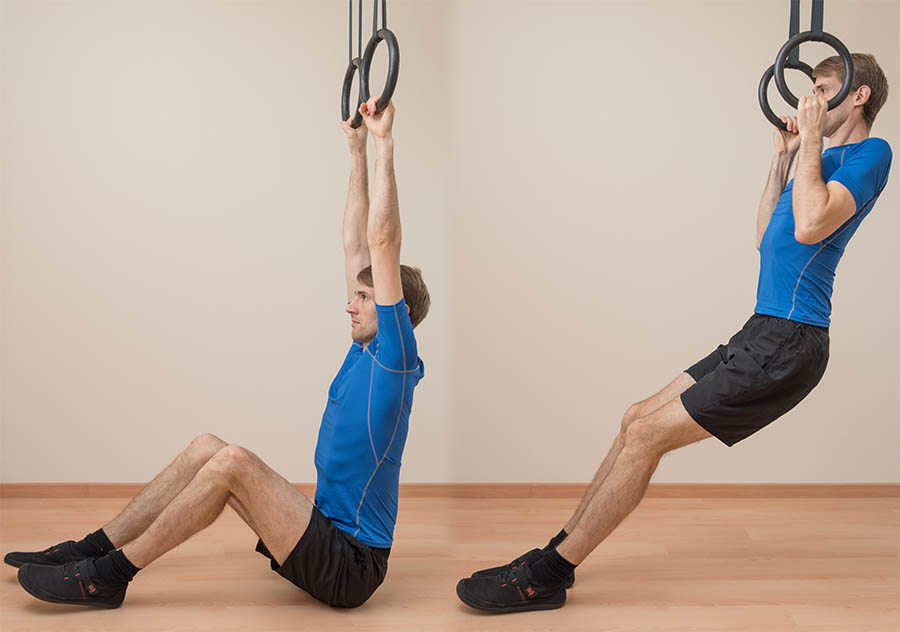
A) Feet on the ground
Use rings or a sling trainer to do chin-ups with your legs on the ground. I don’t recommend pushing up with the legs, but rather keeping your legs slack in front of you on the floor. You won’t have to lift the full weight.
Once you can do 10+ repetitions, you can try the following if you want to bias this exercise towards building strength.
B) Isometric holds
If you are strong enough to hang from a bar, but not yet strong enough to pull yourself up more than once or twice, you can do isometric chin-up holds. Here’s how you do them.
Grab the bar, push yourself up with your legs until you’re in the top position (use a small box or something similar) and then hold for time. Try to hold for a total of at least 90 seconds over as many sets as you need. If you can no longer hold for at least 5 seconds you’re done for the day.
You can also hold in the bottom position but be sure to pull your shoulders down and away from your ears as you do this. Do not let your shoulders shrug up.
Once you can hold the top position for 30+ seconds you’re strong enough for regular chin-ups.
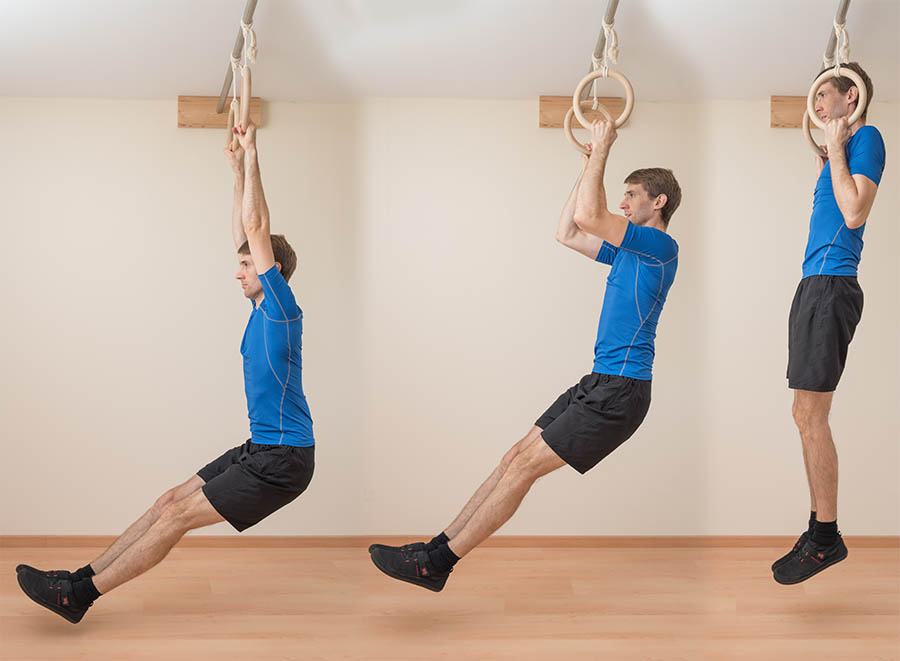
C) Regular Chin-Ups
You can do chin-ups on a bar, but if at all possible I’d recommend doing them on rings or a sling trainer, as they’re much gentler on the elbows and shoulders this way.
D) Pull-Ups
In pull-ups the palms are facing away from you, which makes the exercise somewhat harder. You can read more about the differences between chin-ups and pull-ups here. In short, for general fitness chin-ups are a good choice. If you’re in the military or the police, pull-ups have better carry-over to real world situations.
E) Using Weight / Inserting Isometric Holds
Once the regular variation has become too easy you can use additional weight or insert isometric holds into your repetitions to make the exercise more difficult.
To add isometric holds, do a regular chin-up and then hold at the top for 5 seconds. Do another rep and hold for 5 seconds with a 90° angle in your elbows. Then do another rep and hold for 5 seconds with a 120° angle in your elbows (near the bottom but arms not completely straight). You can increase the time to up to 30 seconds per hold if you want.
To use weights you can either use a weight belt or, if you’re using less than 22 pounds, add some weight plates into a backpack.
“How can chin-ups be cardio?”
To use chin-ups as cardio exercise you need a variation that you can do for at least 15 repetitions. We’ll talk about how to put this into a cardio routine at the end of this article. If you can’t do 15 reps of variation A, try Lat Pull-Downs instead.
More Resources:
- 10 Reasons to Do Chin-Ups
- The Easy Way to Do More Chin-Ups
- More About Chin-Up Technique (Shoulder Safety)
- Chin-Up with 40s Isometric Holds
2. Lat Pull-Downs
Risk: Very Low
The lat pull-down is a great substitute if you haven’t yet built the strength to do regular chin-ups.
For cardio, pick a resistance you can do for 15+ reps.
For strength and fitness, go for something like 3 sets of 12 or 4 sets of 8 and pick a weight that is challenging.
Both, the chin-up and the lat pull-down are good fitness exercises for folks with a knee injury because you don’t need the legs at all.
More Resources:
3. Hanging
Risk: Very Low
This exercise will train your grip, upper back, and will power. Simply grab a chin-up bar and hang from it for 30 to 60 seconds.
Keep your body engaged throughout the exercise by pulling your shoulders down. If you want to turn it into a whole body workout you can brace your abs and put maximum tension in your buttocks muscles as you hang from the bar.
If you’re not friends with the chin-up yet and you can’t get access to a lat pull-down machine, hanging is a good alternative.
More Resources:
4. Hanging Leg Raises
Risk: Low
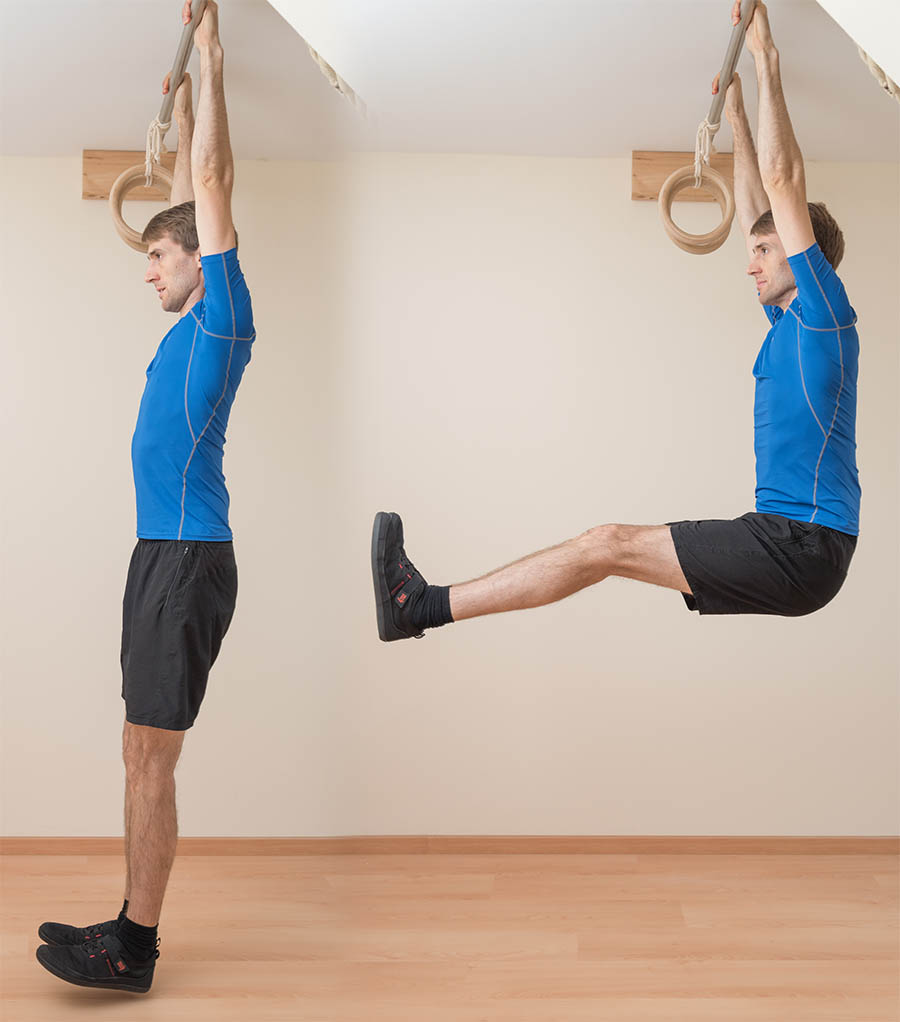
Another way to use hanging is to train your abs by doing hanging leg raises. Depending on how strong you are you may need to start doing them with your knees bent before you can move on to straight leg raises.
Be sure to build ample strength in the hanging exercise before you move on to this one. Don’t do this exercise if it feels weird in your shoulders.
More Resources:
5. Push-Ups
Risk: Low
Two fantastic benefits of bodyweight exercises are that you don’t need expensive equipment to do them and that they will give you honest feedback about your true fitness level. As a guy, if you can’t do clean push-ups or chin-ups for at least 90 seconds, you’re just not in good shape.
Here’s how you can make them easier or harder depending on your strength level.
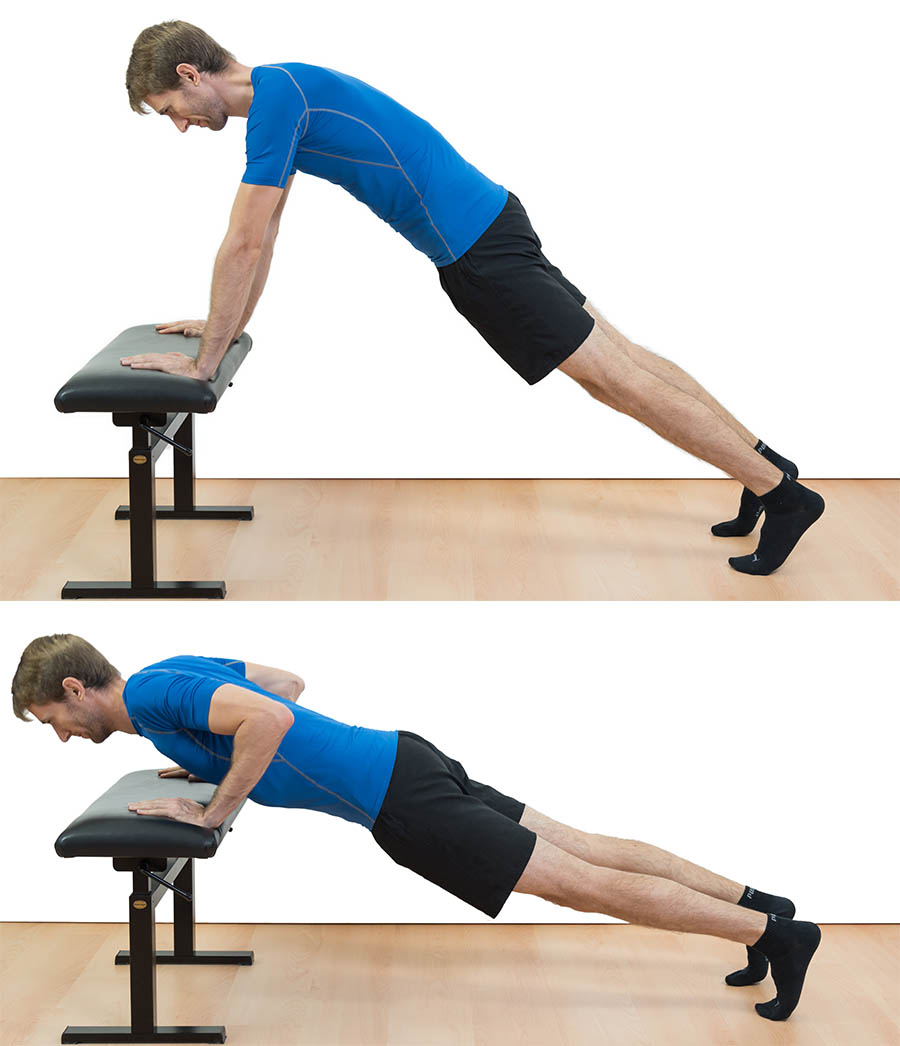
A) Hands on a table
If you’ve never done a regular push-up you can start by doing them with your hands on a table or another elevated surface. This makes them less challenging and allows you to concentrate on good technique.
Technique pointers:
- Hands are underneath your shoulders
- Elbows point towards your feet, not out to the side
- Keep your body in a straight line (place a stick on your back to check for good alignment)
As you get stronger you pick lower objects to place your hands on. After a few weeks you’ll be able to move on to the regular variation.
B) Regular Push-Ups
You can do these on the ground or on rings. The latter variation will challenge the stabilizing muscles in the shoulder more and allows for more range of motion as you can sink down between the rings.
C) Pike Push-Ups
The pike push-up trains your shoulders a bit more than the regular push-up. It’s like an over-head press.
Keep your feet flat on the ground and your back as straight as you can.

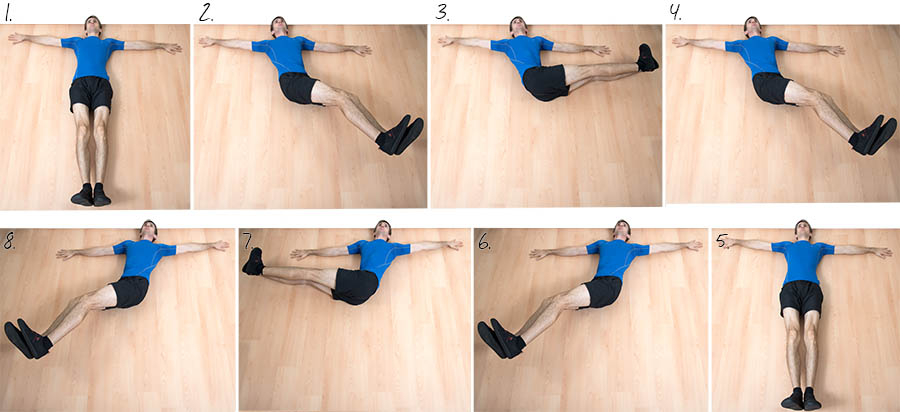
D) Hindu or Dive-Bomber Push-Ups
In these variations you start from a downward-facing dog position and then dive through under an imaginary object until you’re in the upward-facing dog position. You then have two choices:
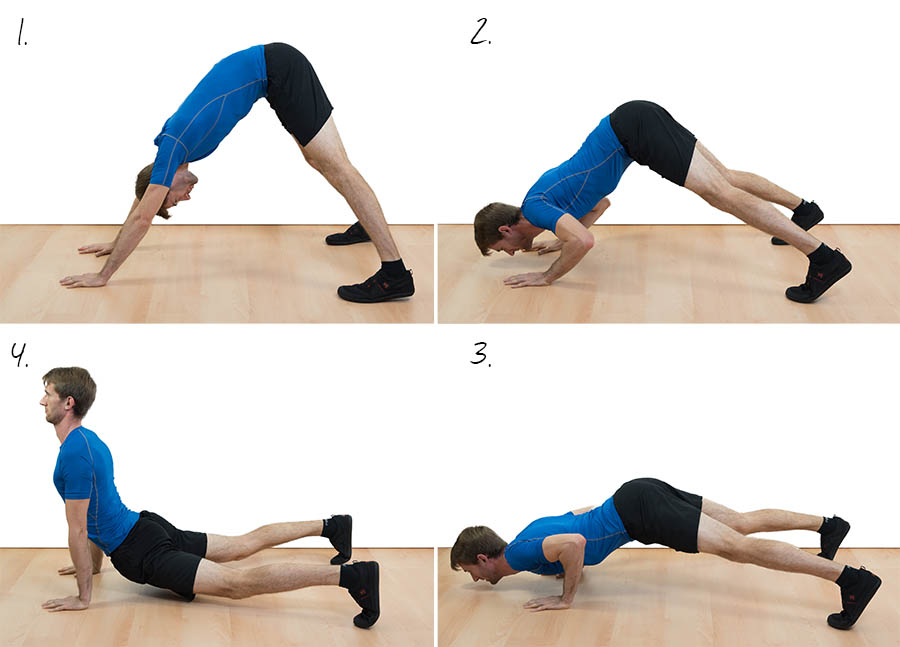
To do Hindu Push-Ups, push up your hips back up until you’re in the starting position. To do dive-bomber push-ups, push back the same way you came, so back under that imaginary bar. Using the image above you’d go 1 -> 2 -> 3 -> 4 -> 3 -> 2 -> 1 for dive-bombers and 1 -> 2 -> 3 -> 4 -> 1 for hindus.
Dive-bombers are significantly more challenging. Hindu Push-ups on the other hand can have sort of a meditative effect once you’ve gotten good in them.
These drills work better if you synch your breathing to your movement. In Hindu Push-Ups you can breathe in during the downward movement and breathe out during the upward movement.
If you’re doing Dive-bombers it’s easier to breathe out on the way down, breathe in at the bottom position, and then breathe out again as you push back into the top.
More Resources:
6) Dumbbell Bench Press
Risk: Very Low
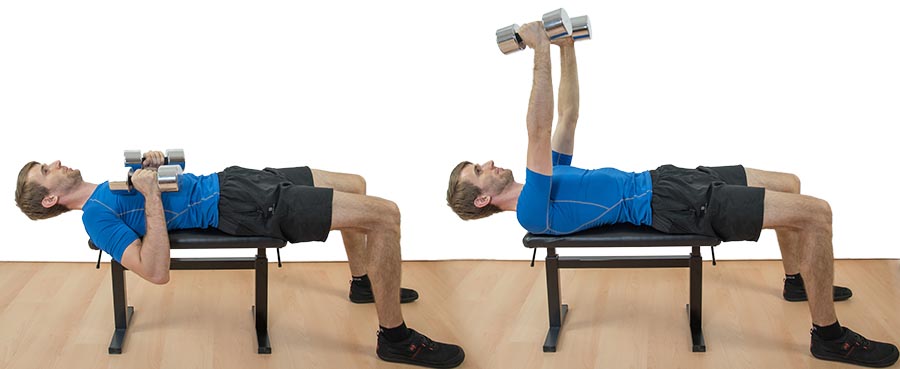
You can train many of the same muscles with the dumbbell bench press or if you don’t have a bench, with the floor press. Your training goals and personal preferences will determine whether push-ups or dumbbell presses work better for you.
More Resources:
Dumbbell Chest Press Technique Demonstration
7) Curls
Risk: Very Low
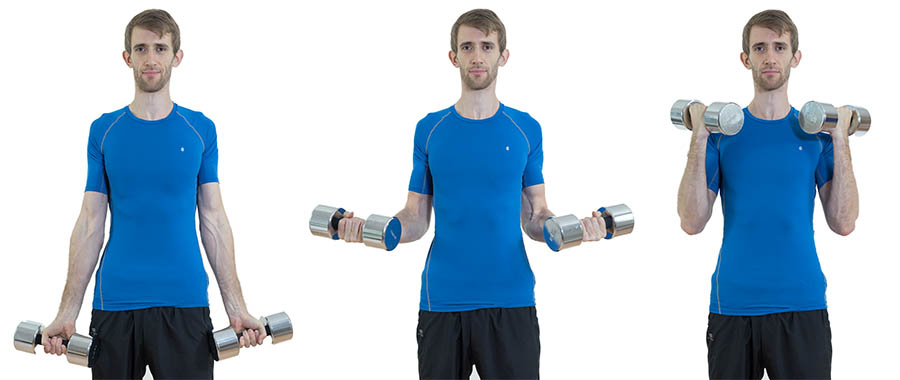
For some gym-goers curls are among the most important exercises and the good news is that even if you can’t stand because of knee pain, you can still do curls: seated curls. This exercise primarily works your biceps brachii, but depending on how heavy you go and whether you use two dumbbells or just one it will also train your core.
More Resources:
Common Mistakes with Dumbbell Curls
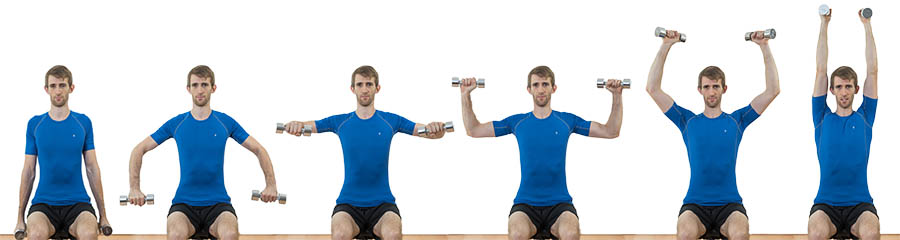
8) Lateral Raises
Risk: Very Low
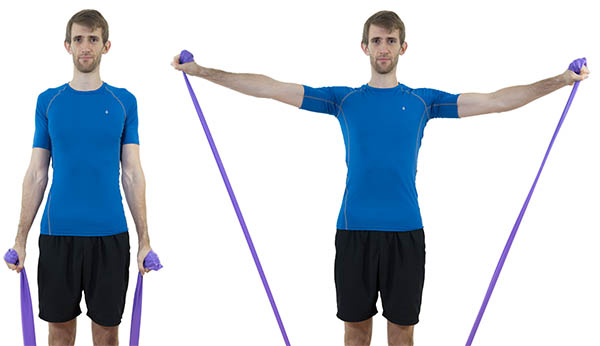
Lateral raises are great if you want to target your shoulders specifically and just like curls you can do them seated if need be.
More Resources:
The Correct and Safe Way to Do Lateral Raises
9) Dumbbell Rows
Risk: Low
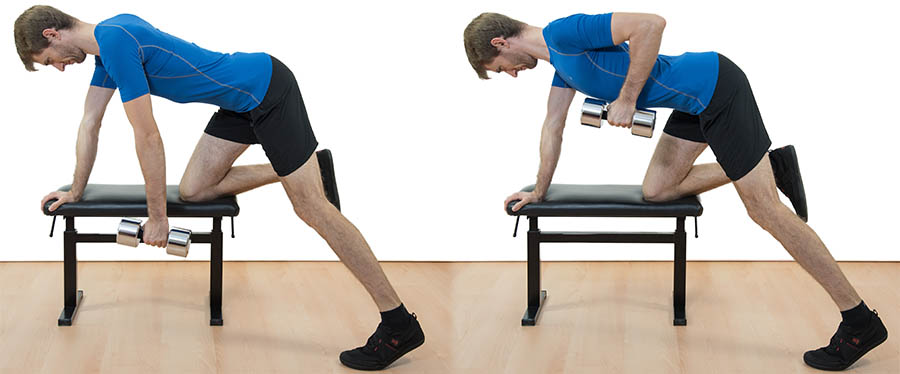
With dumbbell rows you’re not just training your upper back, but also your core because it has to resist the rotation. Dumbbell rows can be scaled to your strength level easily by using more (or less) weight.
More Resources:
10) Inverted Rows
Risk: Low
Inverted rows are a very time-effective upper back exercise. If your training program contains a lot of horizontal pressing, like push-ups or bench pressing, inverted rows can help you avoid muscular imbalances.
You can do inverted rows on a bar or with a sling trainer. To make the exercise easier, raise the handles or keep your legs bent at the knees. You can make it harder by elevating your feet.
More Resources:
Inverted Rows: The Best Upper Body Exercise Known
11) Leg Raises
Risk: Low

Leg raises will train your core, your hip flexors, and they can help restoring proper muscle activation patterns.
When you do leg raises you want to keep your lower back flat on the ground throughout the movement. Only drop your legs as far as you can without your lower back losing contact with the ground. You can make this exercise easier by doing it with your legs bent.
More Resources:
12) Walking
Risk: Low
Walking is one of the best cardio exercises out there because you can do it for hours every day over decades without overloading your joints. So if you’re looking for a gentle way to burn some extra calories, to relax your body, and to unwind after a stressful day, try walking.

More Resources:
On proper breathing while walking
13) Swimming
Risk: Low

A list about cardio exercises that you can do with knee pain wouldn’t be complete without swimming. If you have access to a pool and if you like water, swimming is a good choice. Depending on your type of knee injury you may have to avoid breaststroke or reduce your kicking when swimming freestyle.
More Resources:
Total Immersion Swimming Technique
14) Cycling
Risk: Low
Cycling is another great cardio choice for those with knee pain since it’s low-impact and doesn’t expose the knee to high forces. Pedal with a high cadence and avoid steep terrain to make it even safer.

Ironically, cycling is not a good cardio choice for cyclists with knee pain. Cycling likely contributed to their knee issues so it’s better to avoid it during rehab.
Running or Cycling During Patellar Tendonitis Rehab?
15) Reverse Sled Drags
Risk: Medium
You’ve probably seen pro-athletes use sled training and while it’s great for increasing speed and conditioning, sled training is also great for burning fat without stressing your knees and lower back.
Another benefit is that sled training requires little recovery time between training sessions, since there’s no eccentric component in the movement. In other words, if your knees tolerate sled drags, you can do them often.
In reverse sled drags you walk backwards and either pull a strap with your arms, which adds an upper-body training component, or you wrap the strap around your waist.
More Resources:
Benefits and Proper Form for Sled Dragging
16) Sledge Hammer Work
Risk: Medium
Hitting something with a sledge hammer, usually a tractor tire, is another knee-friendly form of cardio.
More Resources:
17) Grip Training
Risk: Very Low
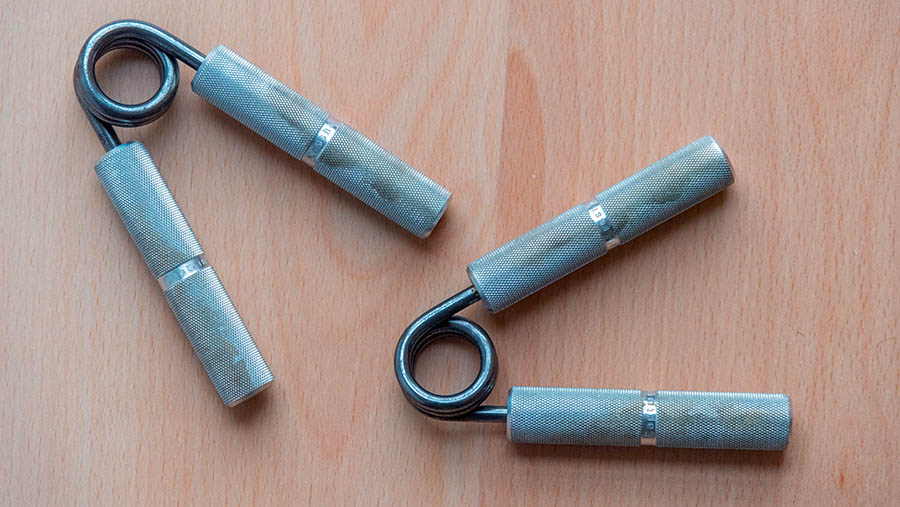
This exercise can give you a few moments to catch your breath during a circuit training routine or be used separately. In many fitness exercises grip strength can be a limiting factor, which is why training your grip can boost your performance in many other drills and a large number of sports.
You can do grip training with grippers, like the Captains of Crush, by holding a sledge hammer, or an unevenly loaded dumbbell.
More Resources:
Navy Seal Chris Sajnog: On the benefits of grip training
18) Training with Indian Clubs / Clubbells
Risk: Low

Clubbells are a little-known training tool used by old-time wrestlers. They’re great for building strength, mobility, and an iron grip. Check out the video below to learn more.
More Resources:
- The Basics of Heayv Club Swinging
- 15 Clubbell Exercises – The swings are obviously riskier for the knees than pure overhead stuff
- Where Indian Clubs Came From
19) Calf Raises
Risk: Medium
Calf raises can help keep your legs in shape if you’re dealing with knee pain. If you cannot do standing calf raises, try the seated variation: sit down on a bench and place a heavy object on your thighs near the knee. Then perform your calf raises. A simple way to do this is to have someone sit on your thighs, but you can also improvise a setup with weights by using some cushioning and a barbell for example.
Standing calf raises train the gastrocnemius more, while seated calf raises target the soleus.
More Resources:
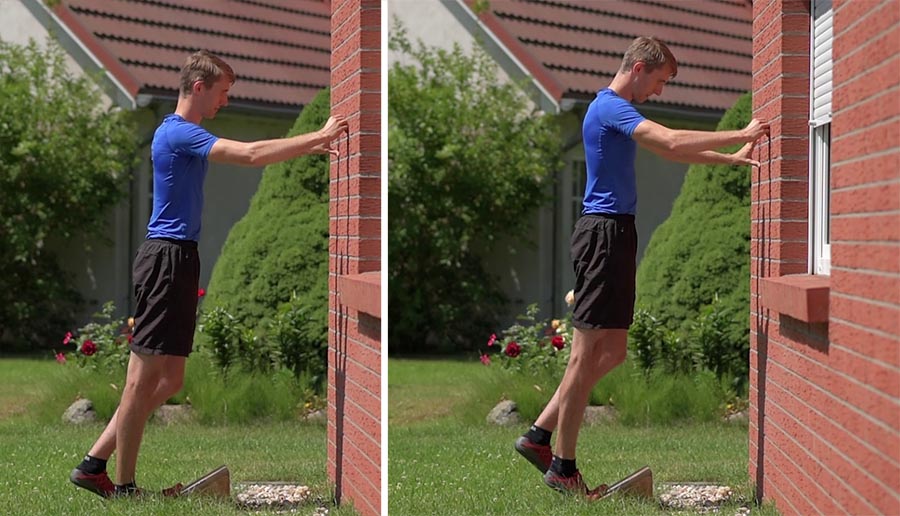
20) Tibialis Anterior Training
Risk: Low
The Tibialis anterior is the small and often overlooked muscle on the front of your shin. Training the Tibialis anterior is important for muscular balance in the lower leg.
You can do this by strapping a dumbbell to your foot, by pulling against an elastic band with your foot, or by pulling your feet up while standing on your heels.
More Resources:
21) (One-Legged) Deadlifts
Risk: Medium
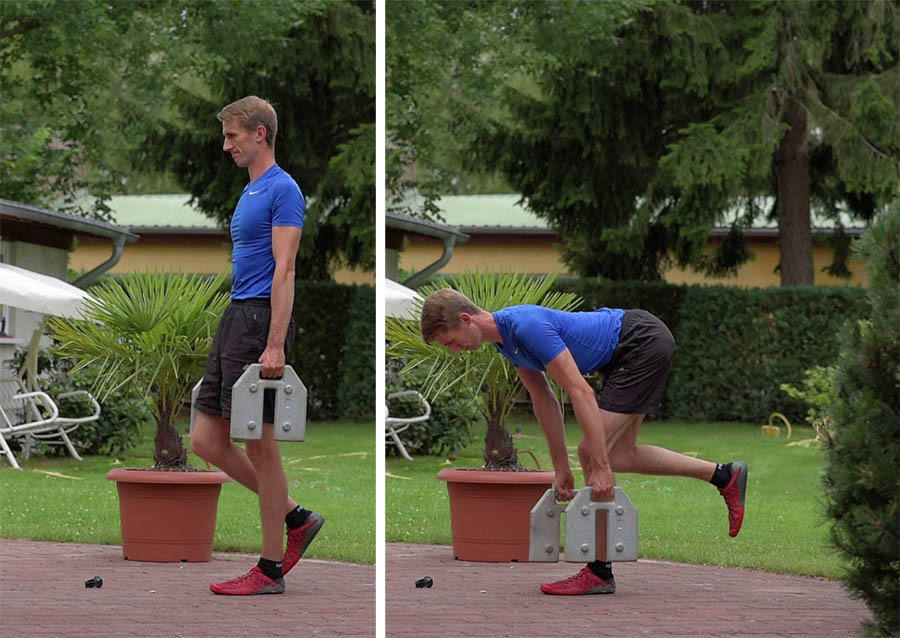
Deadlifts train the posterior chain, the muscles on the back-side of the body (e.g., hamstrings, gluteals, and back muscles). One-legged deadlifts make this exercise safer for the lower back by loading each leg individually, which also trains your balance and the muscles in the lower leg.
More Resources:
How to Do the Single-Leg Deadlift Correctly
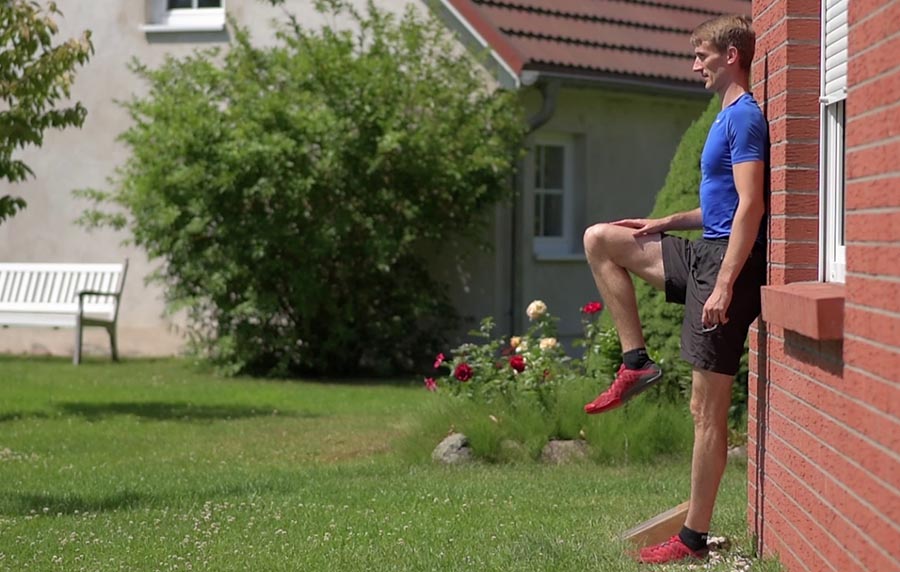
22) The Wall Sit
Risk: Medium
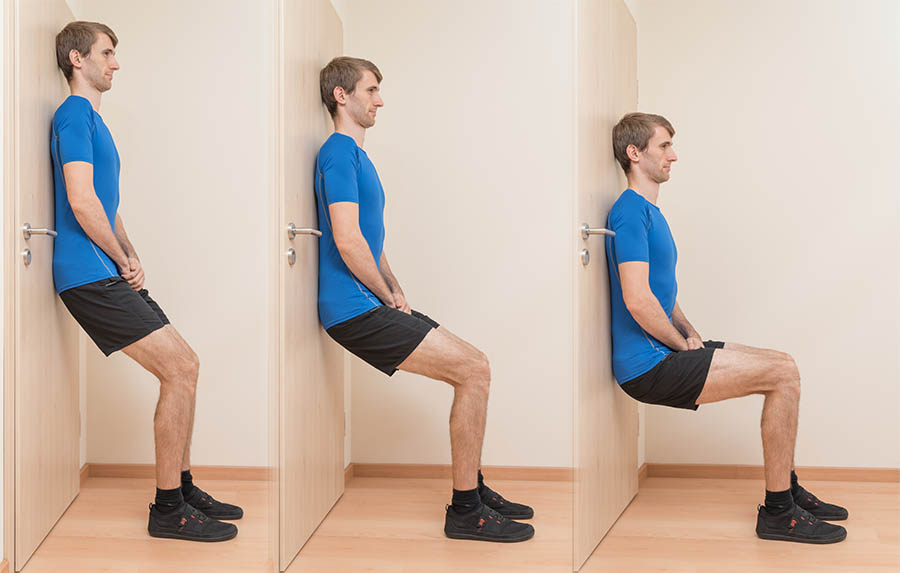
The wall sit is a fantastic rehab exercise for patellar tendonitis and other knee injuries. You can decrease the intensity by keeping your hip higher on the wall and as your knees adapt, you can slide your hip down a few inches every week to make the exercise more challenging.
One participant of my Tough Tendons course did wall sits for 3 sets of 3 minutes. It’s gentle on the knees, but tough on the muscles.
23) The Spanish Squat
Risk: Medium
The Spanish Squat is another rehab exercise for patellar tendonitis. To do this you anchor a thick belt or elastic band to the wall or loop them around a very heavy piece of furniture. Then you place the band behind your calves and step back until there’s high tension in the band. Now you can sit back until your quads are working hard.
Only go as low as your knees can tolerate and stay at that range of motion for 5 sets of 45 seconds. As your knees adapt and get stronger you can increase the time under tension and later range of motion.
24) Taking Stairs
Risk: Medium

Taking stairs has to be one of the most counter-intuitive cardio suggestions for people with knee pain, but with the right technique, it can even be a rehab exercise.
Technique pointers:
- Keep your shins as close to vertical as you can
- Keep your knees aligned over your mid-foot
- Push through your heels and squeeze your buttocks muscles at the top
- Move slowly and without momentum
- Turn it into a smooth and gentle movement.
This exercise works best if you live in a tall building and can take the elevator to get back down. Walking downstairs is much tougher on the knees because of deceleration component, so having an elevator available is a prerequisite for this exercise.
Depending on how your knees react you can try taking two stairs at a time after a few weeks of training.
25) Isometric Stomach Vacuum
Risk: Very Low
The isometric stomach vacuum is a core exercise that will train the transversus abdominus muscle in your abs and it can help you shrink your waistline.
Here’s how you do it:
Stand upright and place your hands on your hips. Now exhale completely and as you do this, try to bring your navel as close as possible to your backbone. Once you’ve pushed out all the air, go for maximum tension (pulling the navel towards your spine) and hold for at least 20 seconds. You can start with 3 sets of 20 seconds and build up to 3 sets of 60 second holds.
More Resources:
26) Overhead Press
Risk: Low
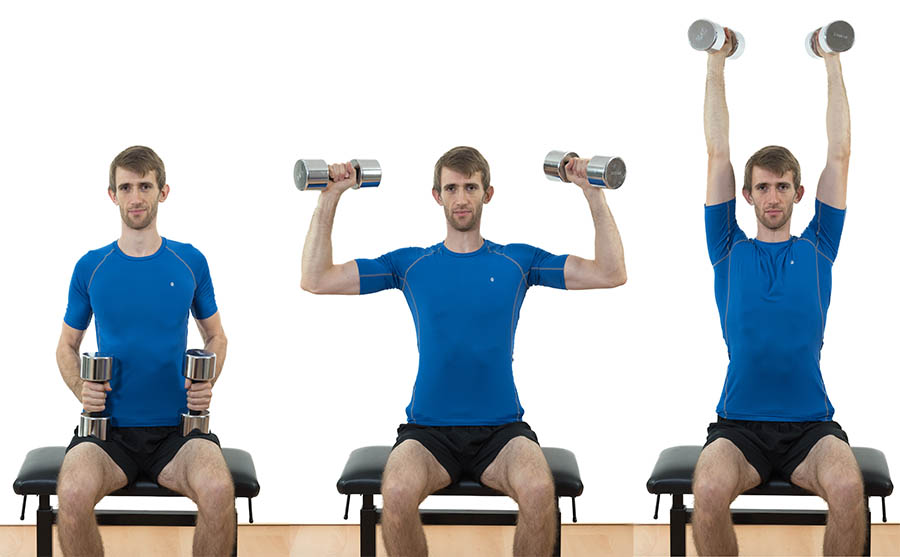
This movement will train your shoulders, your arms, and your chest. You can do overhead pressing with dumbbells, barbells, kettlebells, and improvised weights. If you cannot stand because of knee pain, you can do this exercise seated. Be sure to properly brace your abs to protect your back.
More Resources:
Overhead Press Technique Mistakes
27) Overhead isometric hold
Risk: Low
Holding weights overhead builds shoulder stability and can help teach proper body alignment for overhead pressing. This works very well with kettlebells, but you can also use dumbbells. Hold the weight overhead for 30 to 60 seconds while standing or walking. Then switch sides.
Depending on the weight, training one side at time will also strengthen the oblique muscles.
More Resources:
Kettlebell Overhead Loaded Carry
28) Hip abductions
Risk: Low
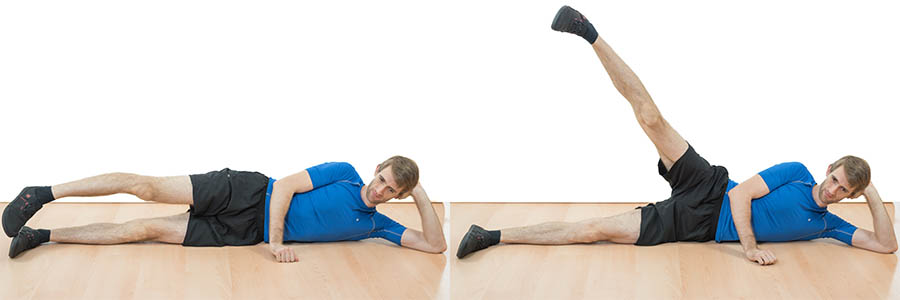
Hip abductions, the tried and true classic of knee rehab, will help you better stabilize your knee when running and jumping. You can also use this exercise to build more attractive legs.
When you do this exercise be sure to tuck your hip under (i.e., slight posterior tilt) and to lead the movement with the heel. Do not point your toes up, as this would load the quad muscles instead.
Go for 3 sets of 15 reps.
More Resources:
Hip Abductions: Common Mistakes
29) Clamshells
Risk: Low
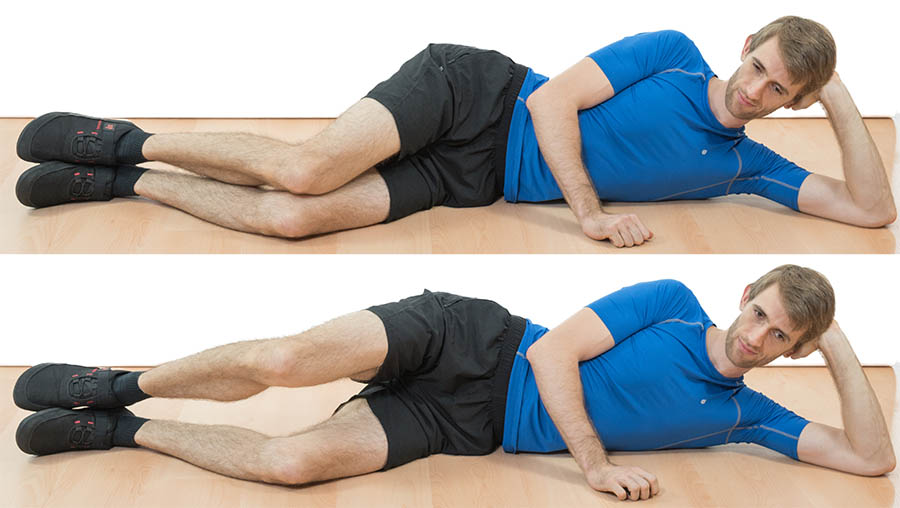
Clamshells train external rotation of the hip and like hip abductions they will make your knees feel more stable. You can also do 3 sets of 15. If that’s too easy, squeeze the top position for 2 seconds or use and elastic band.
More Resources:
Dr Jo demonstrates the clamshell exercise
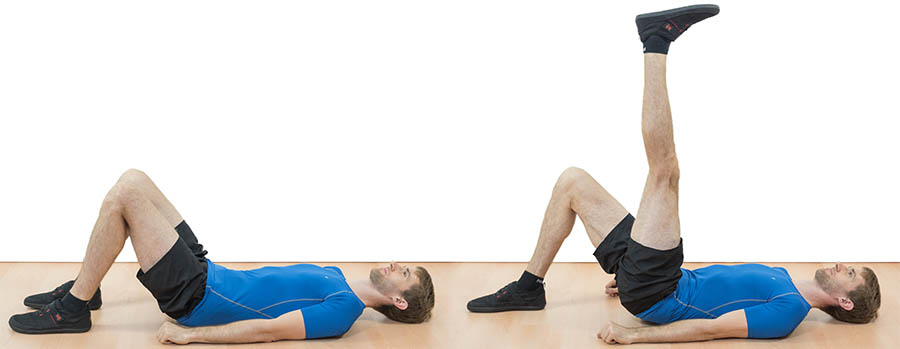
30) Glute bridges
Risk: Low
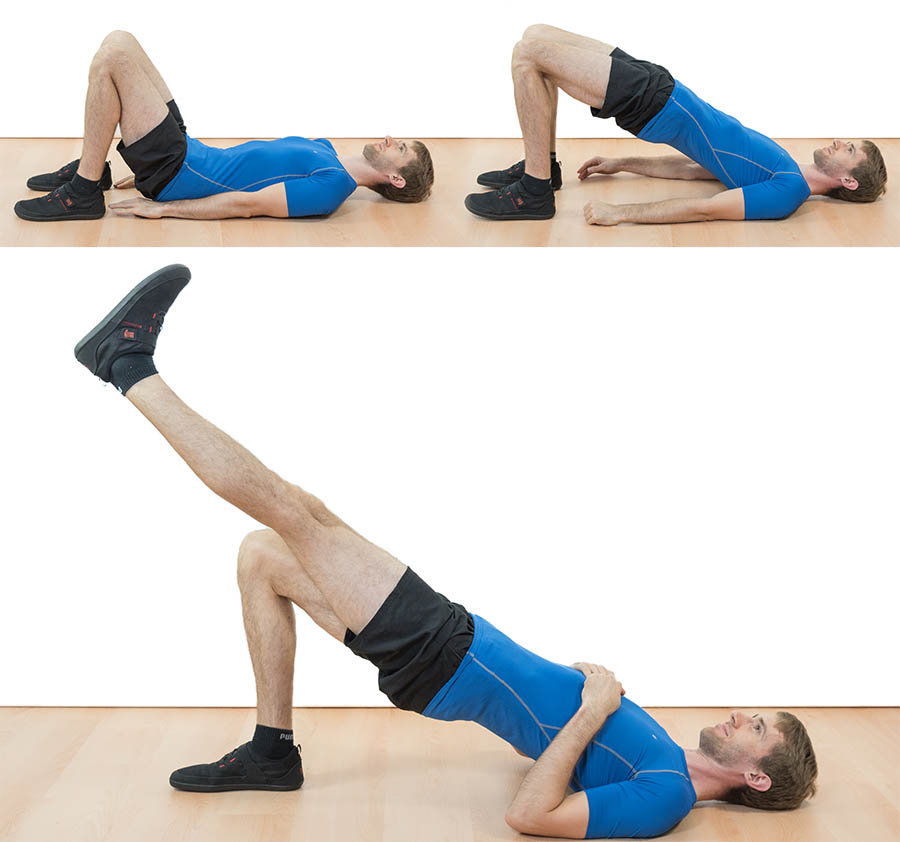
Glute bridges are fantastic for strengthening the hip muscles that create hip extension, a movement you do everything you extend your leg when running or jumping.
Frequent sitting can weaken the hip extensors through adaptive tightness of the hip flexors, a muscle imbalance that can contribute to chronic knee pain, which is why glute bridges can not only help you get rid of pain, but they will also make you better athlete and will make your hips more attractive.
In the beginning you can do the two-legged variation. As soon as you can do 3 sets of 15 with ease, switch to the single-leg variation.
In the single-leg glute bridge you need to pay attention to keeping your hip parallel to the ground. You can place a broom stick on your hip to check.
By wrapping a strong resistance band around your thighs and pushing your legs apart you can also train hip abduction at the same time.
More Resources:
Making Glute Bridges Safe for Your Back
31) Supine leg extensions
Risk: Low
This is a mobility drill for your hamstrings, calves, and ankles. Lie on your back with your knees bent at a 90 degree angle. Now extend one leg up so there’s a 90 degree between your thigh and your upper body. Straighten the leg as much as possible. Then return to the starting position.
More Resources:
Supine Leg Extensions Demonstration
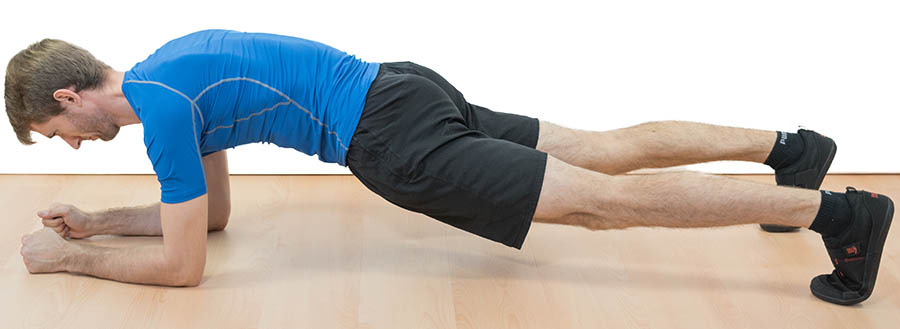
32) Plank
Risk: Medium
Here are variations of this popular exercise.
Regular Plank
This is the one you know. You get down on all fours, place your elbows underneath your shoulders, then you brace your core and put some tension in your buttocks muscle to keep your body in a straight line. Now you hold for time.
To make this more challenging you can reach forward with one hand while lifting the opposite’s side leg off the ground.
Maximum Effort Plank
What if I told you that holding a plank for 30 seconds is enough to get a great training effect?
To do this variation of the plank, get down into the regular starting position, but instead of just resisting gravity, you create maximum tension in your buttocks muscles, core, chest, and lats.
Squeeze every muscle as hard as you can. Imagine someone is bouncing on your back and you have to resist the movement. Depending on how much tension you create, 30 to 60 seconds will be enough to get a fantastic training effect.
More Resources:
33) Side plank
Risk: Medium

The side plank trains your obliques and if you lift the top leg up will also strengthen your hip abductors.
Revolving Plank
In the revolving plank you alternate between the front plank and the side plank. As Steve Maxwell suggests you can finish the movement with the LYT-shoulder series.
More Resources:
Steve Maxwell demonstrates the Revolving Plank
34) Neck training
Risk: Very Low
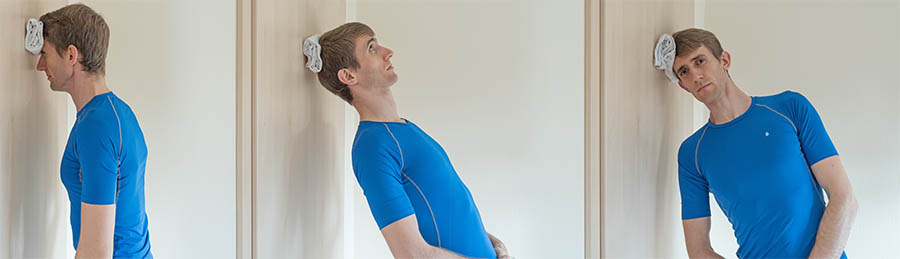
Neck training can help you reverse computer posture and can also reduce your risk of neck and head injuries during accidents.
The simplest way to do this is to place your forehead against a wall and to step away a foot or two. Keep your body in a straight line by tensing the muscles in your neck. You can use a towel to make it easier on your skin.
The same thing can be done with the back of your head and the sides. Alternatively you can do this with manual resistance by pushing into your hand.
Another great neck exercise is this one:
Lie on your back and tuck your chin under to make a double chin. Now lift the back of your head off the ground for about an inch. Hold for 30 to 60 seconds.
35) Scapular Wall Slides
Risk: Very Low

Scapular wall slides, sometimes also called “wall angels” are another postural correction exercise that will strengthen commonly weak muscles in your upper and lower back.
More Resources:
How to Do Scapular Wall Slides
36) Cuban Press
Risk: Very Low
The Cuban press trains external rotation of your shoulders. Strengthening external shoulder rotation is tremendously important for long-term shoulder health, especially if you’re an overhead athlete.
Start with just using 2 or 3 pounds and do 3 sets of 12 to 15 reps. As this gets easy you can slowly increase the resistance, but always focus on proper technique and alignment.
More Resources:
37) Side-Lying Wiper
Risk: Very Low
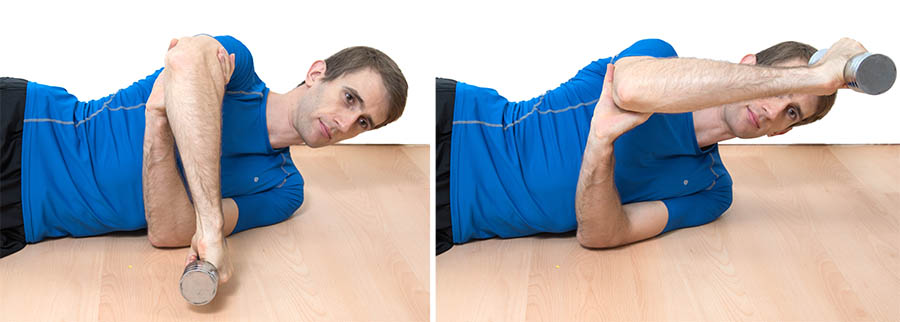
The side-lying wiper is another shoulder health exercise. This time you’re doing your external rotation lying on your side, with one arm out in front you and its elbow bent 90 degrees. Support that arms elbow with your other hand and you’re ready to do some external rotation work.
As with the Cuban press, use very light weights and do about 3 sets of 12 to 15 reps.
More Resources:
How to do the side-lying wiper
38) Kayaking
Risk: Medium

Kayaking is a fantastic form of upper body training if your knees can tolerate being somewhat bent. In contrast to Canoeing, in Kayaking you use a double-bladed paddle. You can do this as more of an endurance type exercise by going for long distances or you can do short distance sprints.
More Resources:
- Men’s Canoe Sprint Kayak Single 200m Semi-Finals – London 2012 Olympics (Check out the upper body development)
- Kayaking Technique Introduction
39) Flyes
Risk: Low
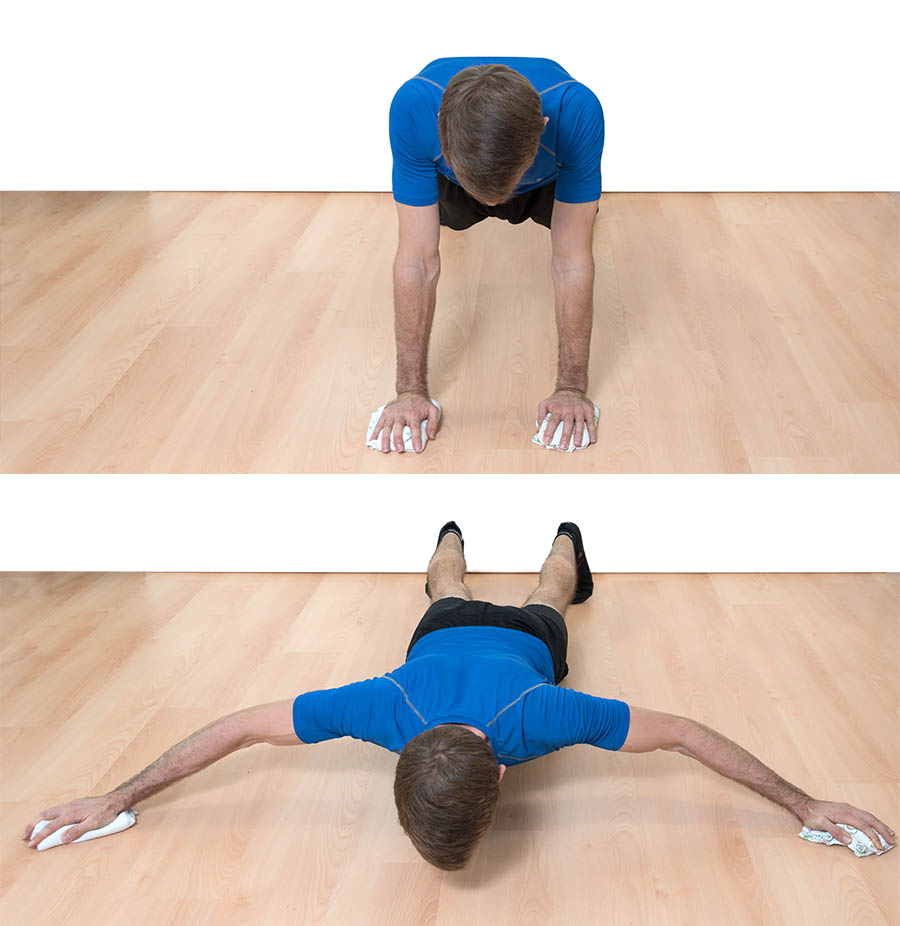
Flyes are a chest exercise you can do with weights, on rings, or with towels on the floor. Use light weights in the beginning until you’re used to the movement to avoid injury.
More Resources:
40) Elliptical
Risk: Medium
The elliptical is another one of those standard cardio suggestions for people with knee pain. Depending on how much load your knees can handle you may have to work harder with your arms.
Compared to the other suggestions in this article the elliptical is not a good use of your time, since you could be getting a much bigger training effect from other exercises.
41) Rowing Machine
Risk: High
If your knees and back are okay with the rowing machine it’s one of the most time-effective cardio options you can do. Definitely give it a shot.
More Resources:
42) Yoga
Risk: Medium
Yoga has many different poses, some of which are safe for people with knee pain, some not so much. If you only have light pain some of the time, yoga can be a great choice to stay in shape.
More Resources:
43) Pilates
Risk: Medium
A good Pilates coach will be able to adapt his or her routine to your situation to work around your knee injury.
44) Tai Chi
Risk: Medium

Much of Tai Chi is a series of gentle movements, which makes it suitable exercise choice for knee rehab. Try it if you can find a good teacher near you.
More Resources:
45) Renegade Row
Risk: Medium

The renegade row is a combination of plank and rowing. You need two weights like kettlebells or dumbbells to do this. Get into the push-up position with the weights underneath your hands. Now lift one weight up in a rowing movement while keeping your body as stable as possible. Put the weight back down and repeat with the other side.
More Resources:
46) Upper body ergometer
Risk: Very Low
The upper body ergometer is like a bike for your upper body. You can set the resistance to a level that allows you to keep going for 10 to 20 minutes and use it for cardio or pick a higher resistance for a more high intensity workout.
If you can find one of those machines, that is.
More Resources:
Benefits & Demonstration of the Upper Body Ergometer
47) Wall holds
Risk: Medium
The wall hold is simple hip flexor strengthening exercise you can use in combination with hip flexor stretching. Simply stand with your back against a wall and lift one leg up so that its knee is at or above hip level. Hold this position for 60 seconds and then repeat with the other side.
48) Chest squeeze
Risk: Very Low
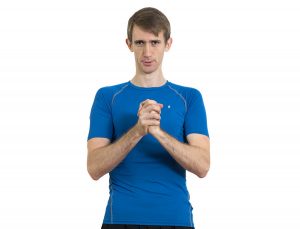
The chest squeeze is an isometric chest exercise you can use as a finisher. Put your hands together in front of your chest and then squeeze with about 50% effort for 30 seconds. Then squeeze with 75% effort for 30 seconds. Finish by squeezing with maximum effort for another 30 seconds. Muster every bit of energy you have for those last 30 seconds.
These next two are not exercises, but training techniques to make exercises easier on the joints.
More Resources:
How to do the isometric chest squeeze
49) Isometrics
Risk: Depends on exercise
The first training technique to reduce the stress an exercise puts on the joints is to do an isometric hold to muscular failure. You can do this with wall sits, calf raises, push-ups, chin-ups, and countless other exercises: instead of moving through the full range of motion, pick a joint angle that feels best for the joint but is still challenging for the muscle and then hold it for as long as you can.
More Resources:
How to perform isometric exercises
50) The 50-75-100 protocol
Risk: Depends on exercise
I learned this training technique in a Steve Maxwell seminar and if I’m not mistaken he discovered it through the book Body by Science (by John Little). This only works for isometric exercises when you’re pushing or pulling against an immovable object (see chest squeeze above).
One example for the curl would be to get a strap, resize it so that the loop is just long enough to step on one end with your foot while holding the other in hand with your elbow bent 90 degrees (like the middle part of the curl). Now you try to do a curl against the band.
First pull with about 50% effort for 30 seconds. When the time is up you immediately continue with 75% effort for 30 seconds. Finally you do 30 seconds with 100% effort: give it everything you got.
The cool thing about this approach is that you can train the muscle to failure without putting your joints or connective tissue at risk because you’re pre-exhausting the muscle with the 50% and 75% rounds before turning it up to 11.
Other examples:
- Apply this to push-ups by having the band cross behind your back
- Do deadlifts by pulling with both hands while standing on the band
- Do chin-ups by using a weight belt and anchoring it to the ground so that you cannot pull all the way up
- Do overhead presses by pressing against a doorway
The options are only limited by your imagination and creativity.
More Resources:
51) Hamstring curl
Risk: Medium
The hamstring curl can be okay for most types of anterior knee pain, but should be avoided with posterior knee pain.
52) Squats
Risk: Medium to High, depending on your knees
Yes, squats, you read that right.
For some knee injuries squats are completely out of the question, but in many cases it’s still possible to find a squat variation that doesn’t cause pain. It all depends on how much your knees can handle.
Here are some knee-friendly squat variations.
A) Partial Range of Motion
Some knees cannot handle deep squats or even squatting to parallel. In these cases reducing squatting depth to the pain-free range of motion is a good option. Just squat as low as you can without pain. Don’t worry if you’re only doing quarter squats.
B) Slow Squats
Another way to make squats safer for the knees is to squat very slowly. Instead of taking 2 or 3 seconds per repetition, try taking 5 seconds on the way down and another 5 seconds on the way up. This is great for the tendons and can be great cardio depending on your fitness level.
C) Isometric Squats
The slowest squat possible is the isometric squat, because you’re not moving at all. Over recent years isometrics have been shown to be a fantastic rehab tool for patellar tendonitis and quadriceps tendonitis, because they stimulate tendons to grow stronger and have a pain-numbing effect in these injuries.
You can do isometric squats by squatting to a depth that feels good for your knees and holding there for time. Go for 5 sets of 30 seconds as a starting point and then build up to 45 seconds.
D) Overhead Squat
One of the toughest squat variations from a mobility standpoint is the overhead squat. Hold your arms straight overhead as you squat. If you’ve never done this chances are the results won’t be pretty, but mobility will improve over time.
This exercise is great for improving posture, shoulder health, and overall mobility. You can make it harder by pulling an elastic band apart above your head.
More Resources:
53) Supine quad squeeze
Risk: Low
Here’s a simple exercise that can help you get your muscle activation back if you’ve had severe pain or have just completed rehab after surgery.
To do this exercise, lie on your back or sit in a chair and then squeeze the quad muscles for 3 seconds and then release. You can add more time as your knee permits until you can do 60 seconds in one go.
More Resources:
54) Seated March
Risk: Low
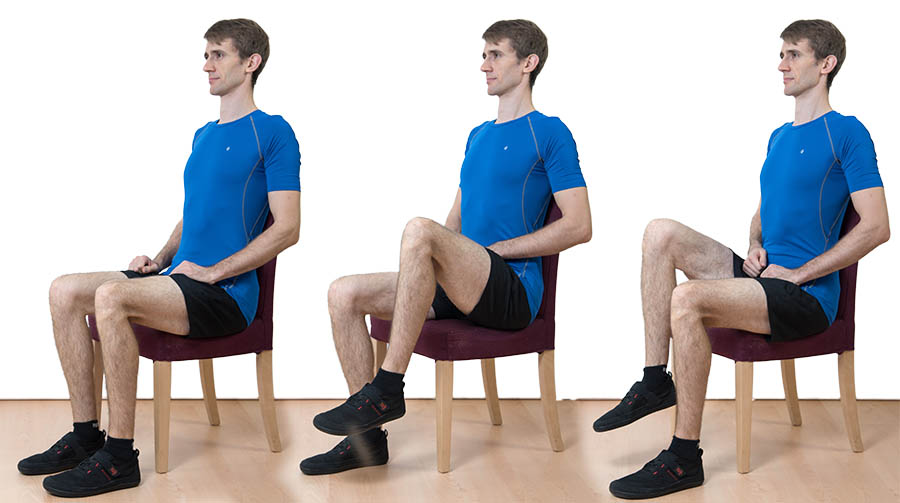
The Seated March exercise is similar to the wall hold because it also trains your hip flexors. It’s a great choice if your knee pain is easily irritated.
Sit in a chair with your knees bent and then lift one knee up. Hold for at least 30 seconds and then do the other side. Try building up to 3 sets of 60 seconds.
More Resources:
55) Underwater exercises
Risk: Low
If you have access to a pool, try underwater exercises. Due to the buoyancy the water provides the load on the knees is very low and it’s also low-impact.
You can try exercises such as:
- Walking
- Sideways walking
- Lifting weights
- Treadmill
- Jogging
- Squats
- Step-ups
More Resources:
56) Neck Joint mobility work
Risk: Very Low

The next few suggestions are mobility exercises. They may not provide a big cardio-vascular challenge, but here’s the thing.
The problem with knee pain and injuries in general is that there’s a tendency to stop your training completely, which over time leads to muscular atrophy and slowly losing your ability to move freely.
Later, when you return to sports after your injury has healed, this lack of mobility will increase your risk of injury dramatically. That’s why it’s best to always do at least some mobility work, even if it’s just a few minutes per day.
Some general technique pointers for mobility work:
- Only work in the pain-free range of motion
- Move gently and without jerking
- Don’t try to force more range of motion
- If something feels weird or off, skip that exercise
More Resources:
57) Shoulder Joint Mobility
Risk: Very Low
The second important joint down from the top is the shoulder. The following shoulder mobility exercises will help you keep your shoulders strong and healthy.
58) Back / Spine Joint Mobility
Risk: Low
The following back and spine mobility drills will reduce your risk of suffering back injuries and can also take undue stress off your shoulders by increasing thoracic mobility.
59) Hip Joint Mobility
Risk: Low
Healthy hips and ankles are an important requirement for healthy knees and hip mobility work will help you keep them fit.
Example exercises:
60) Ankle Joint Mobility
Risk: Low

The body will make up for a loss of mobility at the ankle by forcing an increase of mobility at the knee, which is a contributing factor to several types of knee pain (e.g., PFPS and patellar tendonitis). That’s why every athlete can benefit from doing a few minutes of ankle mobility work per week.
The most basic exercise you can do here are ankle rotations.
Knee circles are great for retraining ankle dorsiflexion. If your knees don’t like the forward movement, elevate the balls of your feet. This way you can go through full dorsiflexion range of motion without having to push the knee forward too much.

61) Windmill
Risk: Medium
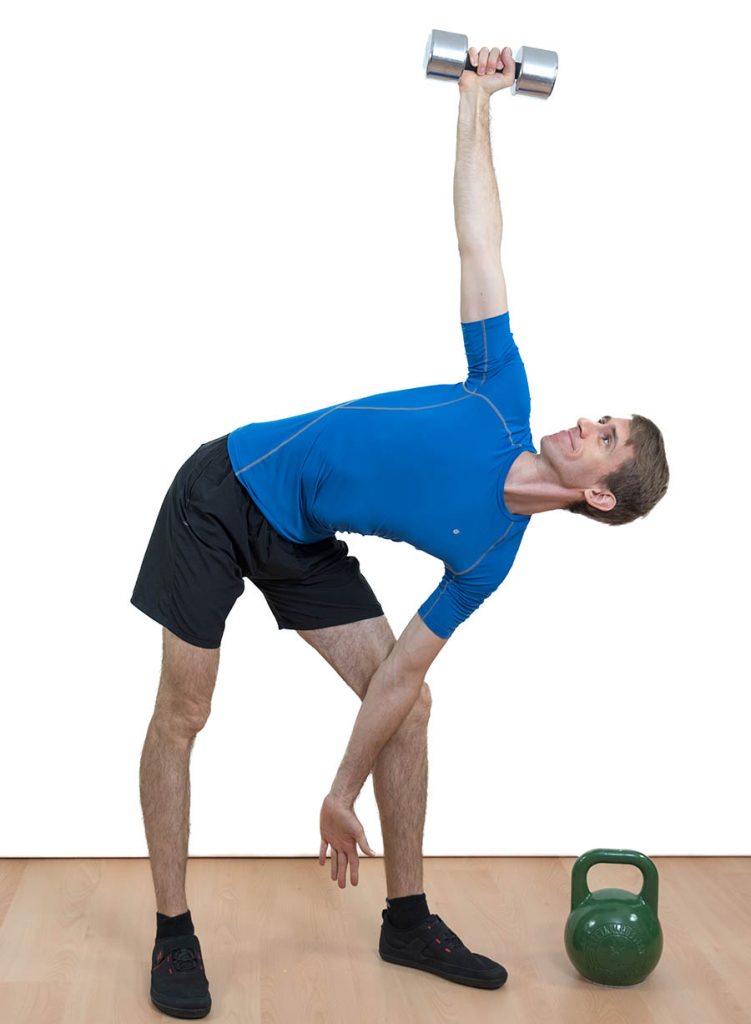
The windmill is a strengthening and mobility exercise that hits the hamstrings, hips, core, and shoulders. It’s an advanced exercise so if you don’t yet feel comfortable with simple overhead holds, train those first.
More Resources:
62) Goblet hold
Risk: Medium
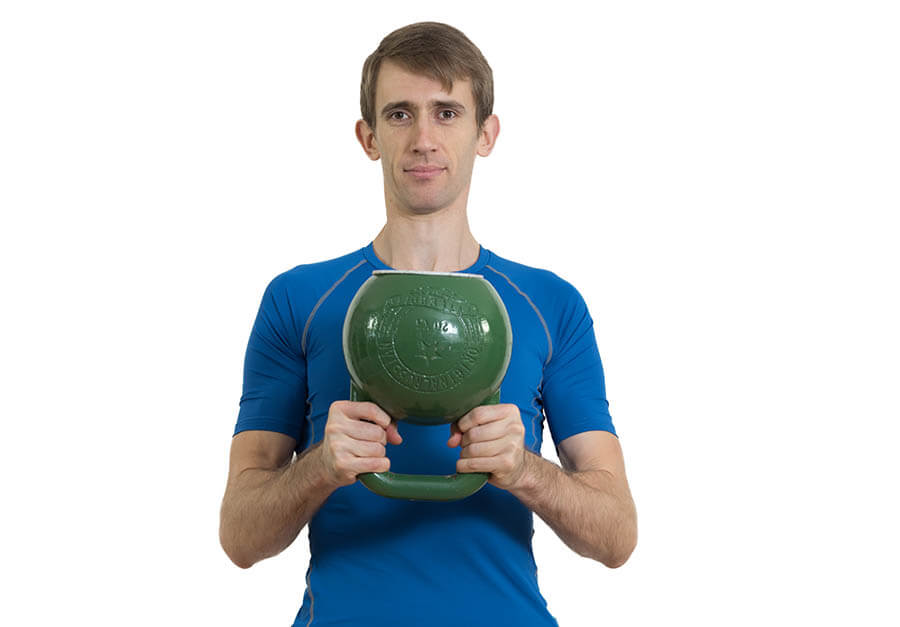
The goblet hold is an isometric exercise for the arms and shoulders, specifically the biceps. Grab a heavy kettlebell or a dumbbell and hold the weight in front of your chest for 60 to 90 seconds.
If it’s too easy you can use more weight or combine it with the chest squeeze exercise: squeeze the weight together. Use the 50-75-100 protocol mentioned above.
Picture
63) Balance drill
Risk: Medium
Have you ever felt a burn in the muscles of your lower legs?
After ankle injuries it’s common to train the lower leg muscles by providing resistance with an elastic band, but just standing on flat ground can already have a tremendous training effect. This type of training will improve your balance and body awareness. It’s also a powerful tool for preventing ankle sprains.
Here are some basic variations from easiest to hardest.
A) Eyes open & arms out
Stand with your feet hip-width apart and pointed forward. Now lift one foot off the ground and balance on the other one. Keep your eyes open and your arms out to the side. Once you can do 60 seconds without flailing, move on to the next variation.
B) Eyes open & arms crossed
This time you’re doing the drill with your arms crossed in front of your chest. Once 60 seconds are easy, try the next one.
C) Eyes closed
Try balancing on one foot for 60 seconds without flailing while keeping your eyes closed.
D) Eyes closed & reaching
Balancing with your eyes closed is easy? Try to reach for the ground in front of you and 45° to the side with your hand (like a blind one-legged Romanian deadlift).
One of my favorites is balancing with my eyes closed for as long as I can and once it becomes too difficult I open my eyes and continue until I’ve balanced on one leg for 3 to 5 minutes.
Back in my basketball days I once landed on another guy’s foot after coming down from a defensive rebound. I pivoted to do an outlet pass and only then did I notice that I was standing on a foot. Thanks to all the one-legged training my lower leg muscles were quick and strong enough to prevent a sprain.
64) Dips
Risk: Low
Dips will strengthen your chest and your triceps. In dips your pushing up about 95% of your bodyweight, which is significantly more compared to push-ups (about 64%).
You can do dips on a bench, with a dip machine, and on rings.
If you keep your body more upright it will challenge your triceps more, but may aggravate your shoulders. If prefer to do them with more forward lean.
Also, be sure to pull your shoulders down and away from your ears as you execute this exercise.
More Resources:
65) Cable wood chop
Risk: Low
If you have access to a cable machine you can do a large variety of upper body and core exercises that are safe for your knees. I just want to mention a few, starting with the cable wood chop.
The cable wood chop is a fantastic core exercise.
More Resources:
66) Cable punch
Risk: Medium
The cable punch strengthens your core, as well as your arms and chest.
More Resources:
Cable Punch Demonstration – You could also use more weight and execute the movement more slowly
67) Kettlebell Halo
Risk: Low
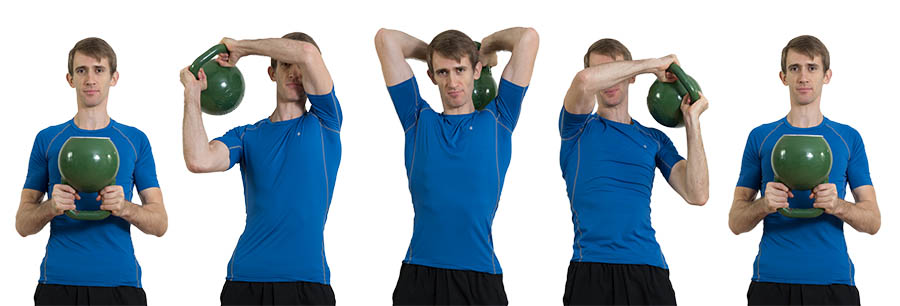
The kettlebell halo is a kettlebell warm-up drill for your core, upper back, shoulders, and arms.
Hold a kettlebell with the bottom up and then move it around your head in circles. Be sure to brace your core to protect your back.
Men can use 16 kg as a starting weight. Women can use 8 – 12 kg, depending on how strong you are.
More Resources:
68) Farmer’s Carry
Risk: Medium to High
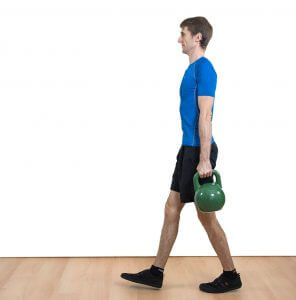
The farmer’s carry is a whole-body exercise that is particularly challenging for your grip. Grab two heavy dumbbells or kettlebells and just walk with them.
More Resources:
69) Suitcase Carry
Risk: Medium to High
The suitcase carry is similar to the Farmer’s carry, but you’re only carrying one weight. This makes it more taxing for the core muscles, particularly the obliques.
More Resources:
70) Brettzel
Risk: Low to Medium
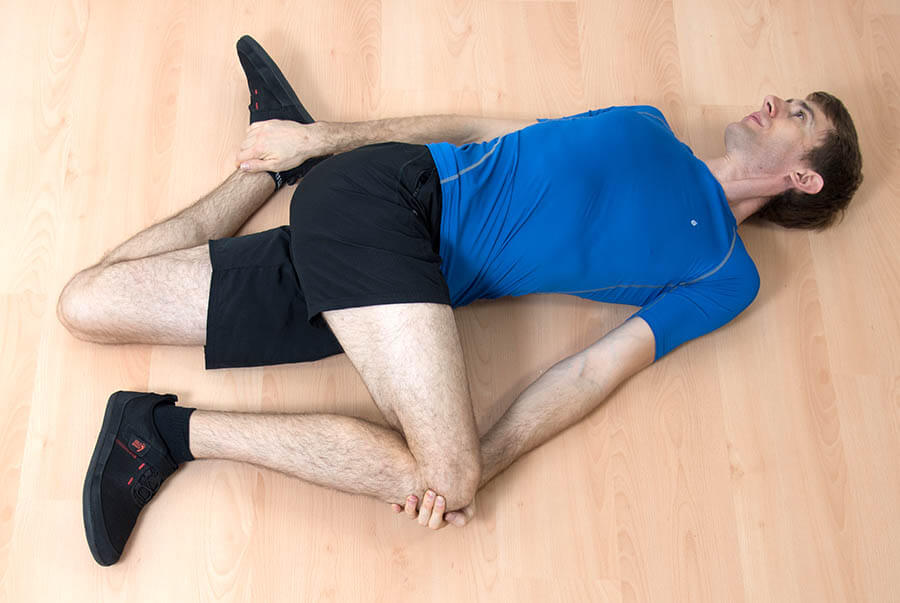
The Brettzel is a mobility drill for the thoracic spine. Improving thoracic mobility can help alleviate shoulder issues, which makes it a great tool for overhead athlete. It is named after Brett Jones.
If your knees cannot tolerate the quad stretch that’s part of the regular Brettzel, do the exercise without holding on to the other side’s ankle.
More Resources:
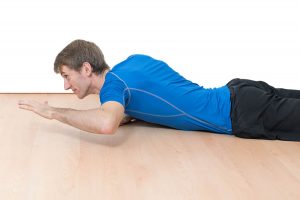
71) Prone Cobra
Risk: Low
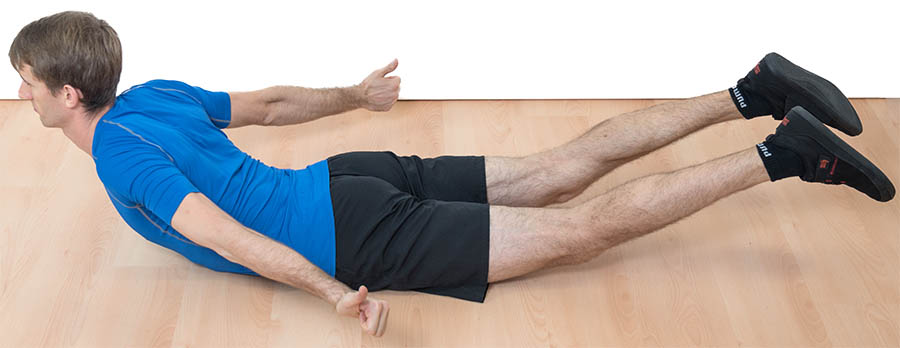
The Prone Cobra is another fantastic exercise for correcting computer posture. Start with short sets and build up until you can hold for up to 3 minutes.
More Resources:
72) Good mornings
Risk: Medium
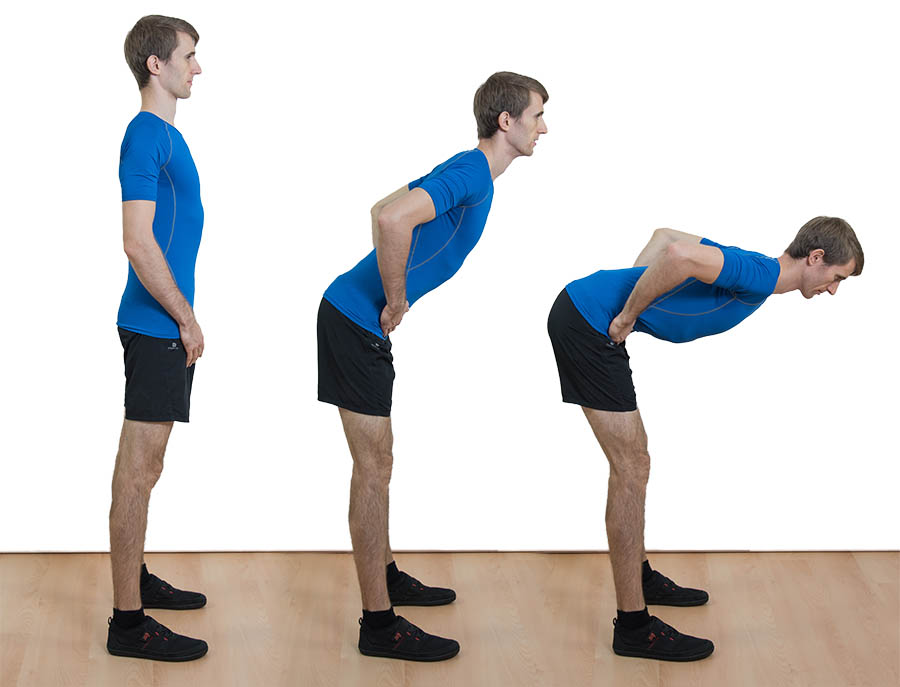
Good mornings will strengthen your back and can help restore normal length and function to the hamstrings. You can do these with just your body weight or with a barbell.
More Resources:
73) Crunch
Risk: Low
The crunch is one of the most basic core exercises and it can provide a good workout even if you have knee pain.
More Resources:
74) Ab wheel
Risk: Medium
The ab wheel is a tough core exercise that you need to approach carefully. Done incorrectly it can quickly hurt your lower back or shoulders, so be sure to start with reduced range of motion and to work up slowly. To protect your back, do this exercise with a slight posterior pelvic tilt.
More Resources:
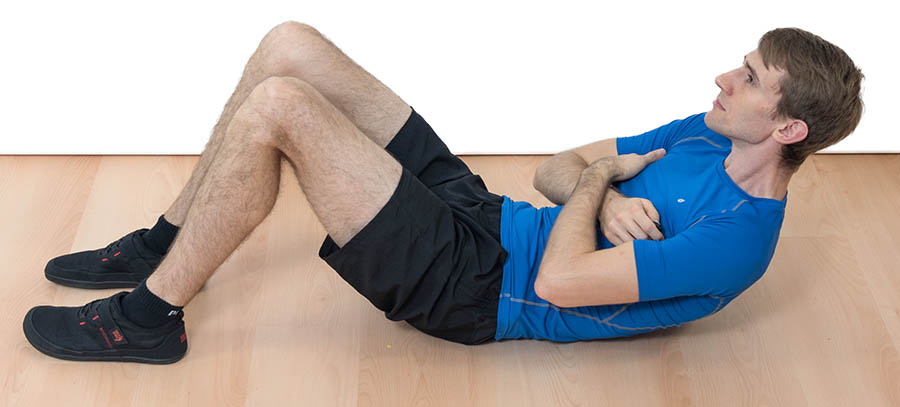
75) Janda Sit-Up
Risk: Low
The Janda Sit-Up is a sit-up modification created by Czech neurologist Vladimir Janda. It uses reciprocal inhibition to avoid recruitment of the hip flexor during the movement. Here’s how you do it.
Anchor an elastic band to a heavy piece of furniture or a piece of exercise equipment. Then sit down on the ground and place the ends of the band around your calves, close to your ankles. Now move back until your knees are bent to about 90°, with medium tension in the band.
Now you can begin your sit-ups and as you do this, keep pulling against the band with your heels and squeeze your buttocks muscles throughout the movement. If you want you can stretch your arms out overhead during the lower part of the movement to make the eccentric harder. Take about 3 seconds for the eccentric part and lower yourself under control.
More Resources:
76) Resistance band exercises
Risk: Very Low
You could probably create a list with 100+ resistance band exercises alone, so if you’re looking for even more variety, that’s what I’d look more into next. Here are three simple suggestions for the upper body.
A) Behind the back pull-aparts
Hold the band behind your back and pull it apart while keeping your shoulders down and away from your ears.
B) Resistance band curls
Step onto a resistance band and grab the other end with one hand. Pick a heavy band that you can only pull on with effort. Now do curls. If the band you have is too light you can loop it around your hand and foot multiple times. If the band is too strong, remember that you can also do isometrics with the 50-75-100-principle mentioned earlier.
C) Face pull
Anchor the band to a sturdy piece of furniture or some heavy exercise equipment at around chest or face height. Now do a rowing movement pulling towards your face. You can do the same movement with a cable pulley and even on rings.
More Resources:
77) Pallof Press
Risk: Medium
The pallof press is a core exercise that will target the oblique muscles. You can do it with a cable machine, with bands, or as a partner exercise.
78) Nordic curls
Risk: High
This is the toughest hamstring and glute exercise I’ve done so far. For this exercise you need ample padding under your knees and the setup is also a bit difficult to get right. Here’s what it looks like.
Be sure to move slowly and under control. There’s no point in doing this exercise if you just fall to the ground.
More Resources:
79) Kettlebell swings
Risk: Medium to High
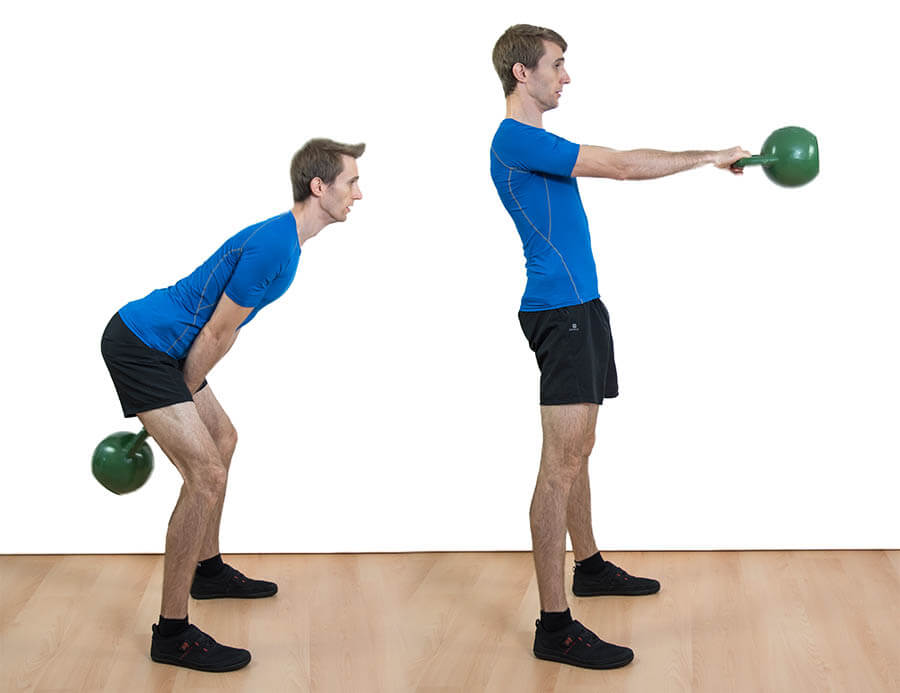
Kettlebell swings are a fantastic cardio exercise. Use more weight to bias swings towards building strength endurance. Use less weight to focus the exercise more on cardio. ALWAYS execute the exercise with good technique to avoid injury.
More Resources:
80) Kettlebell high pull
Risk: Medium to High
The high pull is a kettlebell exercise that trains the hips, glutes, core, and shoulders. The goal of this exercise is not to go heavy. Use light or moderate weights that allow you to perform the drill with good technique and avoid exhaustion.
More Resources:
Kettlebell High Pull Technique
81) Kettlebell snatch
Risk: Medium to High
Hailed as the king of kettlebell exercises by some, the kettlebell snatch will strengthen your hips, core, shoulders, grip, and cardio-vascular endurance. This is a highly technical skill, so it’s best to learn this exercise in person from a qualified instructor (e.g., RKC, StrongFirst, Maxwell-certified).
More Resources:
Kettlebell Snatch Technique – Be sure to practice the technique diligently before going for high reps
82) Reverse crunch
Risk: Low
The reverse crunch is another knee-friendly core exercise that specifically targets the lower abs.
More Resources:
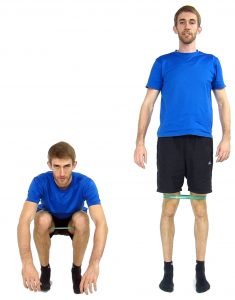
83) Boot strapper
Risk: Medium
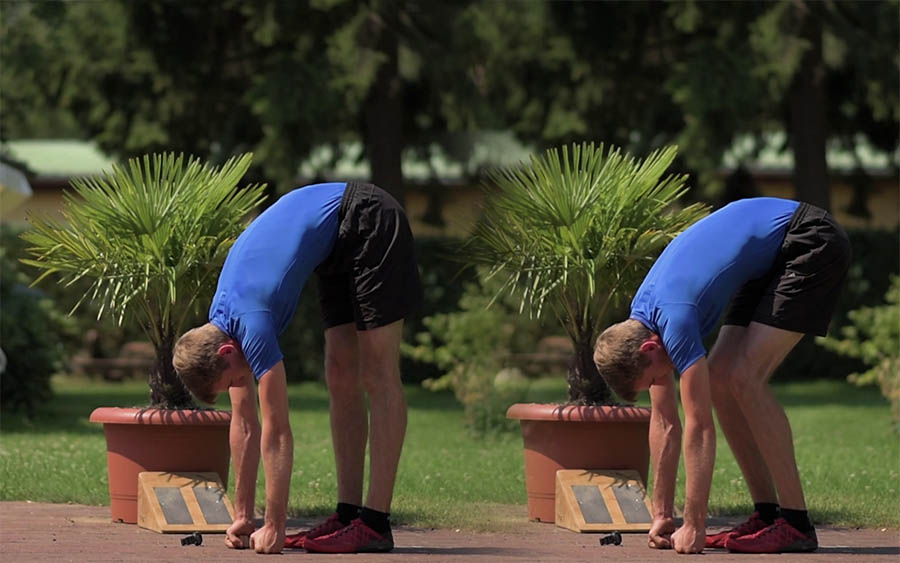
The Boot Strapper is a combination of mobility drill, stretch, and cardio exercise. You stand with your feet about hip-width apart and pointed forward. Now bend your knees and touch the ground in front of you with your palms.
If you cannot touch your palms to the ground you can reduce the distance by placing a book in front of your feet and touching your palms to the book instead. As you get better you can pick a thinner book.
Exhale and straighten your legs until your knees are completely extended. Hold for a moment and go back into the starting position with your knees bent. Go for 30 to 100 repetitions.
More Resources:
84) L-Sit
Risk: Medium

The L-Sit can be done on the ground, on push-up handles, between two chairs, and on rings. It will strengthen your arms, shoulders, core, and hip flexors.
More Resources:
L-Sit: Demonstration and Progressions
85) Amosov Squat
Risk: Medium
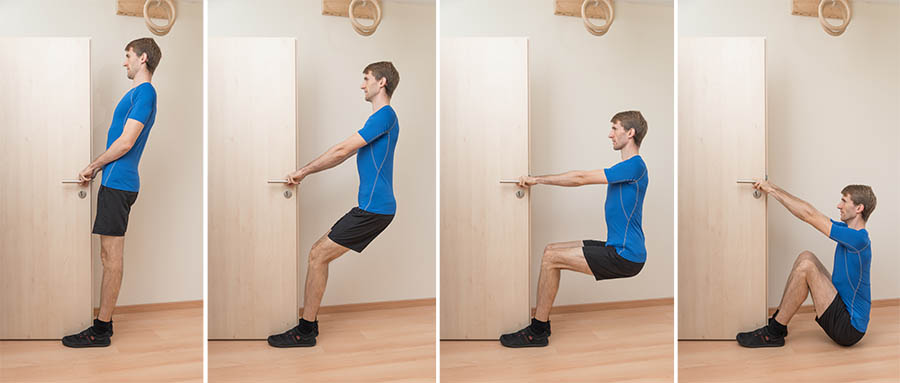
The Amosov squat might just be the perfect cardio variation of the squat for people with knee pain. You do it by holding on to something for counterbalance so that you can lean back as if you were water skiing.
More Resources:
86) Wall Squeeze Rows
Risk: Low
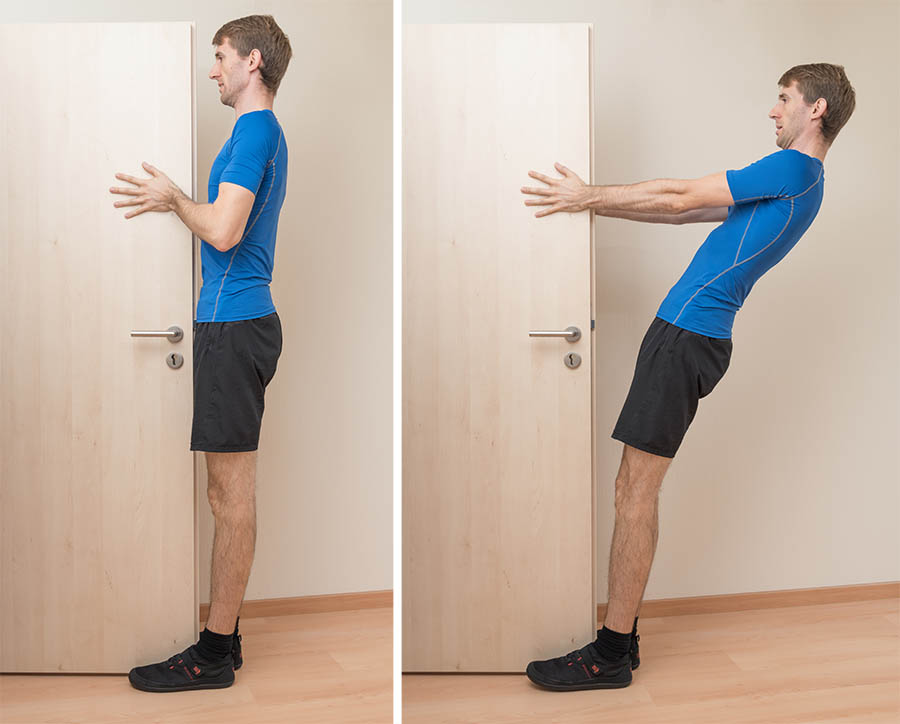
This is a simple bodyweight exercise you can do in a doorway. Hold on to the wall by squeezing your hands together and then do a rowing movement.
More Resources:
87) Flutter Kicks
Risk: Low
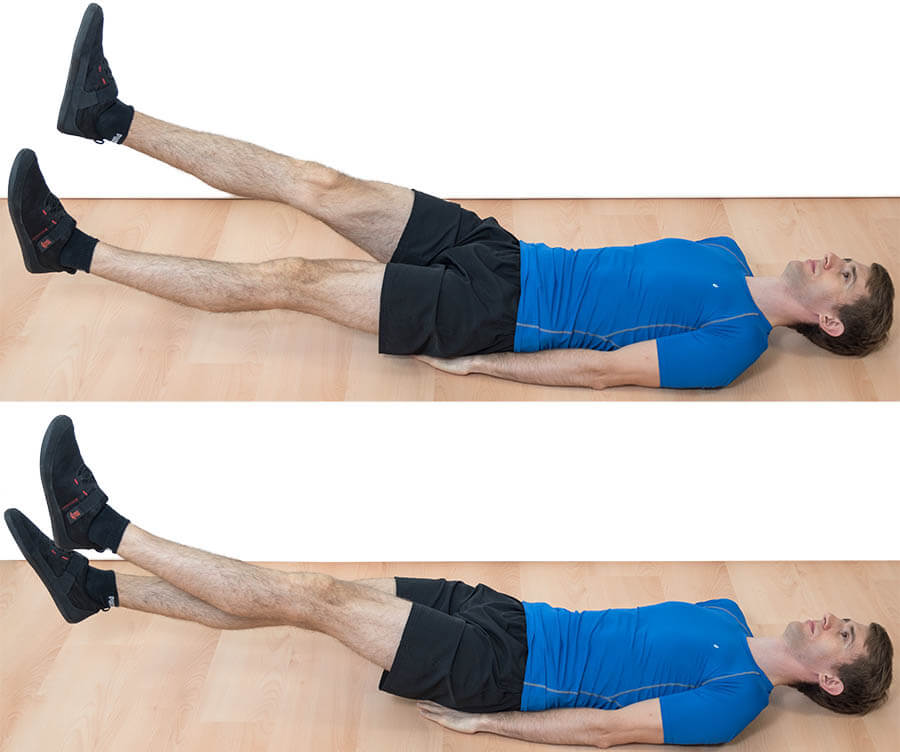
Flutter kicks will train your core, hip flexors, and will power. Lie on the ground with your palms under your buttocks and your heels about 6 inches off the ground. Now lift one foot up about 15 inches and drop it back into the starting position. Repeat with the other side.
More Resources:
Flutter Kicks: Demonstration & Technique
88) Handstands – Holds or Pushups
Risk: Low – Medium, depending on how softly you come down
Handstands are another great upper body exercise. If you’re just starting out you can do them as handstand holds for time.
As you get stronger, you can begin doing eccentric handstand pushups.
More Resources:
89) Superman
Risk: Low
The superman exercise is great for the back muscles and the hip extensors. It’s also great for countering computer posture.
More Resources:
90) Floor Wiper
Risk: Low
To do the floor wiper, lie on your back with both of your feet about 6 inches off the ground and your arms out to the side. Now keep your feet together and close to the ground as you bring them up towards your right hand. Get as close to your hand as you can and then repeat for the other side. You don’t necessarily have to touch your hands.
More Resources:
91) Rope Climbs (no legs), Rope Hangs, Rope Chin-ups
Risk: Low

Once you can do 15+ chin-ups it’s time to try something more challenging: rope climbing. I prefer using a rope with a 1.5 inch diameter because it’s more challenging for the grip. Get a rope that feels nice in your hands. Ropes made from hemp are said to be easiest on the hands, but they start to rot if they get wet often.
You can do a huge variety of exercises on the rope: regular climbing, rowing movements, hanging on for time, climbing with a larger distance between your hands, and many more.
More Resources:
Rope Climbing Tutorial by a world record holder
92) Full Contact Twist
Risk: Medium
The Russian twist is an advanced core exercise that specifically targets the obliques. You need a barbell to do it. Here’s a demonstration.
93) Banded Squat
Risk: Medium
The banded squat is a squat variation that will also work your hip abductors. Wrap a strong elastic band around your thighs and then do slow squats in your pain-free range of motion. I recommend doing these very slowly. Take around 10 seconds per repetition and do 10 reps: that’s enough for a good hip workout.
Done for fewer repetitions the banded squat can also be a nice warm-up exercise.
94) Prone Shoulder Series
Risk: Very Low
The LYT-Series is another upper back exercise that also strengthens the rotator cuff. Here’s how you do it.
95) Battle Ropes
Risk: Low
The Battle Ropes exercise is one of the most intense upper body cardio exercises you can do. You can see this exercise in the training of pro-athletes as well as actors, because it’s such a fantastic strength and conditioning tool. The only downside is that you need a gym that has them.
More Resources:
The Science Behind Battle Ropes
96) No legs crawling
Risk: Low, especially if you wear knee pads
You’re training at home and don’t have any equipment? Try crawling without using your legs. It will be easy enough the first minute or so, but then the fun begins.
97) Glute-Ham-Raise
Risk: Medium to High
The glute-ham-raise can help you build stronger hamstrings. If your gym has a GHR machine, be sure to give this a try.
Creating Your Cardio Routine
A simple way to create a balanced training routine is to pick exercises based on the 5 pillars of human movement:
- Pulling: Vertical & Horizontal
- Pushing: Vertical & Horizontal
- Level changes: Hip-dominant & knee-dominant
- Rotation / Pivoting Movements
- Locomotion
With severe knee pain, groups 3 through 5 may not be an option, which is why we’ll focus on upper body and core exercises for this example routine.
I recommend using an interval timer app instead of counting reps, as this makes focusing on proper technique and breathing easier. Do each exercise for 20 to 40 seconds (active phase) and then take a 5 to 10 second break before switching to the next exercise.
I recommend starting with 30 seconds on, 10 seconds off and adjusting the duration of the phases from there. The shorter the break, the harder the routine will be on your cardio-vascular system. The longer the active phase, the more you will challenge the strength endurance of the involved muscles.
Circuit A:
A1: Regular Push-Up Variation
A2: Flutter Kicks
A3: Dumbbell Rows Left Arm
A4: Dumbbell Rows Right Arm
A5: Pike Push-Up or Hindu Push-Up or Dumbbell overhead press
A6: Scapular Wall-Slides
A7: Superman Exercise
A8: Balance Drill of your choice
A9: Glute Bridge Left Leg
A10: Glute Bridge Right Leg
Here are 3 timer settings for different intensities:
- Easy: 20 seconds on, 10 seconds off, 20 minutes total
- Medium: 30 seconds on, 10 seconds off, 25 minutes total
- Hard: 40 seconds on, 10 seconds off, 30 minutes total
For some people easy will still be too hard and hard will still be too easy. Just keep adjusting the numbers to your individual level of fitness and be sure to pick exercise variations that you can do with good technique for total duration of the circuit.
There’s no point in training for 30 minutes if the last 10 are just hanging on for bare survival with shoddy technique at the risk of getting injured. If it’s too tough, pick easier variations or adjust the duration of the phases as mentioned above.
Which Exercises Are Okay For Your Knee Injury?
The question that remains is which exercises will be safe for your specific type of knee pain. Here’s how to find out.
Acute vs. Chronic Pain
Do you have an acute episode of knee pain or is it more chronic pain? For acute pain, only use exercises with a very low risk of pain. For chronic pain the next 3 sections will tell you more.
Do you have full or only partial ROM?
In some knee injuries certain knee angles will be painful.
For example, different parts of the cartilage on the underside of the kneecap are in contact with the femur depending on your knee angle. If that cartilage is damaged, pain could be limited to the range of motion at which the damaged cartilage serves as articulating surface.
If you only have limited pain-free range of motion, you want to stay in that pain-free range. If you have full range of motion you don’t need to limit yourself outright.
Anterior vs. Posterior Pain
Is your pain on the front of the back of the knee?
Anterior (front) knee pain includes injuries such as patellar tendonitis, quadriceps tendonitis, and PFPS for example.
Examples for posterior knee pain include distal hamstring tendinopathy, baker’s cyst, PCL injuries, and meniscal issues.
Either way you want to avoid exercises that stress the side of the knee that your injury is on.
So if you have posterior knee pain, deadlift variations, Nordic curls, the Glute-Ham-Raise, and other exercises that place direct tension on the muscles on the back of the leg are out.
For anterior knee pain, you want to be careful with exercises that work the quad muscles.
In both cases the more risky exercises are sometimes safe, but this depends on your knee’s load tolerance.
How strong is your knee?
Your knee may not yet be strong enough for certain exercises. For example, while a Wall Sit may be okay for you, a bodyweight squat may be too much. In this case a squatting-type movement is not completely off the table, but you need to find a variation your knee can handle, like the wall sit, which is sort of an isometric squat.
That is why you should start with low risk exercises and slowly feel your way forward to determine what your knee can handle without becoming (more) painful. As your knee gets stronger you may be okay with medium and even high risk exercises later on, but you need to approach this carefully.
You can stay in great shape already with just the low risk exercises, as you will see when you try the example circuit.
Downloads & Links
Here’s a number of downloads and links that you may find useful.
Printable version of the example cardio circuit
Interval Timer app for your phone or laptop (No ads and no installatio)
Get rid of knee pain with my 7-day email course
It’s Your Turn
Try the example circuit and let know how you liked it.


